Boosting Apps Using AWS CloudFront with Latency Routing Origin


One of the most interesting elements of our work as DevOps Engineers at 10Clouds is exploring solutions to complex product problems, some of which we’ve never come across before. Such projects might even include unusual infrastructure solutions. Often, they lead to the discovery of fresh approaches for using resources, which we wouldn’t have previously considered. In this blog post, I wanted to describe one of these projects, which yielded a very interesting solution.
A brief overview of our challenge
The project consisted of a few, very important applications deployed on the Elastic Kubernetes Service (EKS) that is a part of the whole infrastructure in the client’s AWS account. As far as the EKS is concerned, there were actually five clusters in five different regions bound together. This was done so that the applications would be highly available simultaneously and across regions.
An additional aspect was that the architectural resources differed, depending on the service.
In the case of a certain app, there was a requirement that, apart from the fact that it would be deployed by default in the EKS cluster, it could also have an additional caching layer in the form of CloudFront distribution. At the same time, the latency between the individual elements of this application architecture had to be as low as possible. We should remember that there were five separate instances of the said application, which had to be connected to the caching layer in a sensible way so as not to lose the advantages of high availability and cross-regionality at the same time.
Exploring different solutions in AWS
Bearing in mind that CloudFront internally doesn't support simultaneous, multi origin traffic handling for the same URL path, the configuration of such a solution has become quite problematic. Ultimately after reviewing the specifications of several AWS services, we managed to develop a quite interesting approach, which additionally provides some useful functionalities that improve the reception of the application itself.
Before I present a description of how the entire solution was configured and how the individual elements of the AWS cloud were bound together, it would be useful to briefly describe each of these resources separately and mention a few words about their specific functionalities that were used.

Amazon Route 53
The first is Amazon Route 53. As the documentation describes, it is a scalable and highly available Domain Name System solution. It lets you register your domain, route traffic to resources for your domain, check the health of those resources and react to changes in that health status. From myself, I would also add that it lets you move all of the records to it, from your other DNS provider and manage them straight from the Route 53 dashboard.
Two of the options mentioned above will be of particular interest to us. It's the functionality that allows you to route the domain traffic to selected resources and the health check configuration possibility. In case of the former, Route 53 uses the so-called "routing policies"
They include policies such as:
- Weighted Routing
- Latency Routing
- Failover Routing
- Geolocation Routing
- Multivalue Answer Routing
One of these routing policies has been used in the discussed solution. More specifically, it's latency routing, which, like health checks, is described in the next subsection.
Latency routing
Latency routing or latency-based routing is one of Route 53 features that lets you bind resources from different AWS regions and provide your users with application experience from instances that would distinguish itselves with the lowest latency.
What it means is that we could for example have the same application in both Asian and European regions, create latency records for instances in these regions and let Route 53 direct your traffic separately for each user, based on the latency of the data that they request.
Latency routing works based on data about traffic between users and AWS data centers. That is why it is not advisable to use it with resources not placed in the AWS Cloud. This even applies to resources that are embedded in the same location as AWS data centers.
DNS failover based on health checks
One of the essential functionalities of the Route 53 service is the health checks mechanism. In short, it is a tool that allows you to constantly monitor the resources represented by the so-called record sets in Route 53 in order to confirm that the given entities are healthy and able to handle requests.
If a specific number of tests performed by health checkers receive an incorrect result, Route 53 will consider the resource to be offline and, if the service itself is properly configured, it will remove this resource from the group of those to which the user's traffic is directed. This configuration method is called DNS failover.
In the discussed solution, we will configure latency based routing with DNS failover to detect when a specific application instance in a given region stops working and thus remove it from the group of resources that CloudFront uses to cache specific portions of data.
Amazon CloudFront
Amazon CloudFront is another AWS cloud service that allows you to significantly accelerate the operation of your website from the perspective of what the user feels. In fact, its main functionality is the caching of static and dynamic elements of your website, such as files with the extensions .html, .css, .js or image files.
The data recorded in this way is then served in response to the user's request using a global network of data centers, which are called edge locations. Importantly, cached resources are not served from random edge locations, it is done on the basis of latency analysis. This edge location, which is able to offer the fastest reaction to the request, which is equal to delivering specific page elements to the user, has priority and it will then be used as the source of the buffered content.
If you would like to get more information on edge locations and the Global Edge Network, you can find this in the official documentation.
How CloudFront caches new content
Solutions such as AWS CloudFront need to have configured locations from which to obtain and then save selected content. In CloudFront, these places are called ‘origins’ - and these are usually apps or websites that we want to speed up.
Depending on whether the specific items are already in the cache or not, one of the following things can happen:
- if the content is already in an edge location that gives a specific user the fastest response time, data is delivered from there immediately;
- in the case when specific data is not in the edge location, CloudFront must first obtain this data from the defined origin, provide it to the user and then save it, so to be able to serve it instantly from a specific edge location when a similar request is made
In the case of the architecture from this blog post, we had as many as five potential origins. Each of them was the same and should be used equally when serving requests from the same path. AWS CloudFront, however, does not support a solution that would allow you to configure it directly in this way.
CloudFront origin failover and why this feature didn’t fit
By looking at the documentation of the CloudFront website, we can find information there that it has an interesting function. It is something that is called origin failover. This option, when properly configured, allows us to quickly redirect user traffic to the backup origin, when the primary origin is unavailable. It returns a specific HTTP status code, indicating that a failover should take place.
This description generally sounds very good and you might think that maybe even in the case of five origins it would work perfectly.
Unfortunately, it turned out to be a little more complicated. First of all, origin failover can only be configured for two origins, one of which must be marked as primary and the other as secondary. In this configuration, the primary origin handles all traffic that passes through the CloudFront, while the secondary origin acts only as a backup and if the first will always be able to handle the traffic, the second would never have a chance to use the resources that have been allocated to it.
As we have five origins located in separate regions, each of which was capable of handling quite a large number of queries, we wanted to make the most of them. Therefore, we couldn’t use this functionality.
So how did we reach a solution?
In the section above, I mentioned that CloudFront cannot connect multiple origins to serve the same resources in parallel. Therefore, if we have five sources to be connected at the same time, the matter becomes very problematic. As it turned out, using additional AWS services, you’re able to not only circumvent this limitation, but also increase the speed of the caching itself on the edge locations side, as well as provide full support for HA and cross regionality.
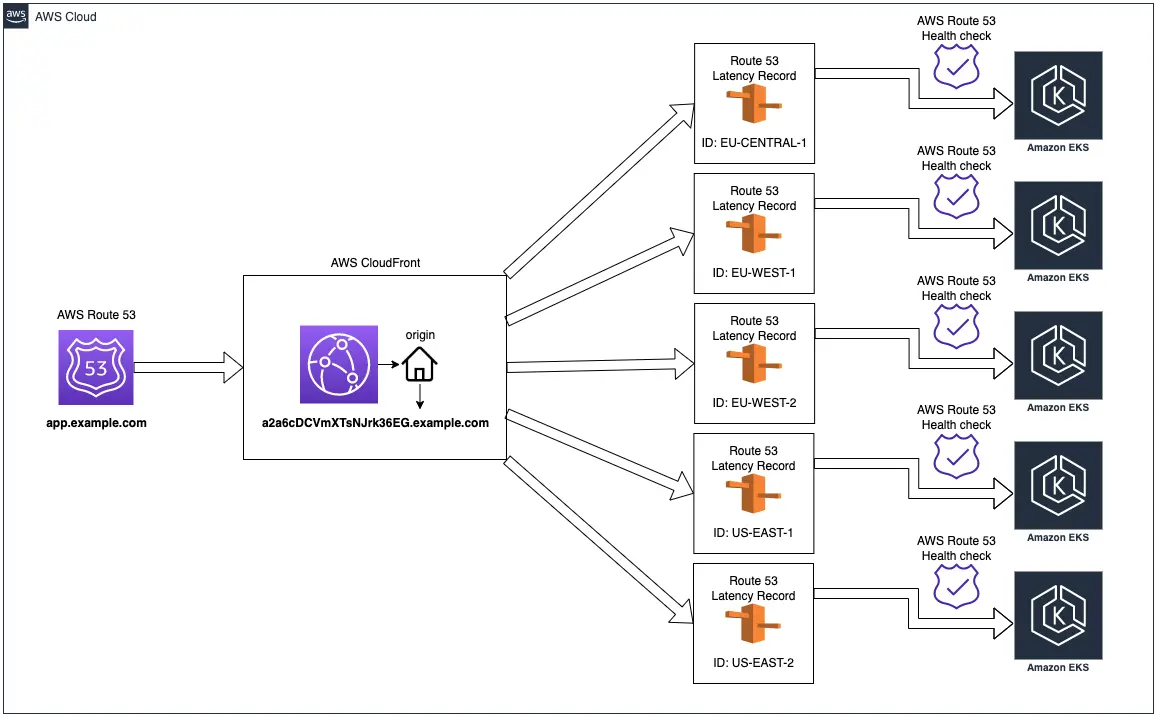
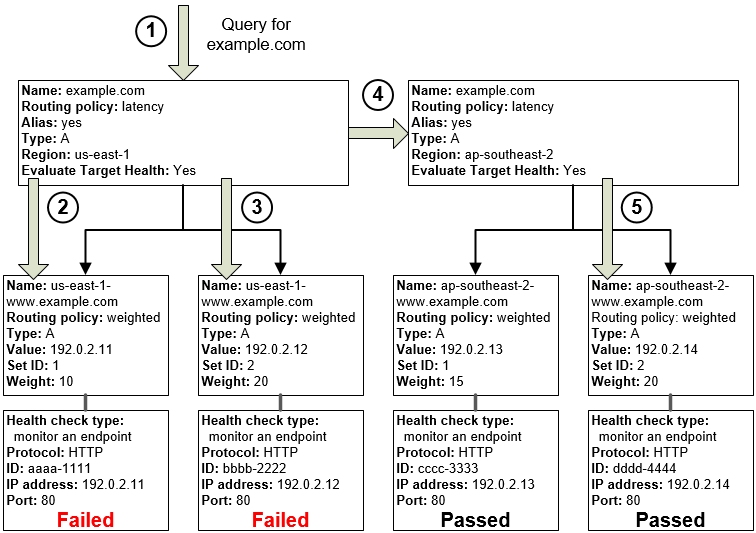
As you can see in the diagram above, all configuration starts with the domain configured in Route53. This domain is a special type of alias that allows you to direct traffic to the designated CloudFront distribution.
AWS CloudFront has been configured to ensure the best availability and geo-location. Therefore, it uses edge locations from every available region simultaneously. There is also an alternative domain configured with the SSL certificate generated in the AWS Certificate Manager service, equal to the one under which the application should potentially be hosted. There is only one origin configured, but it's a latency routing record. We have five entries of this type in Route53, each of which directs traffic to a separate loadbalancer of the EKS cluster in different regions. The rest is handled by the ingress controller.
Each latency routing record in Route53 has a separate Record ID that distinguishes it from other similar records with the same domain. Moreover, each of these records has a health check configured to control and monitor application responsiveness. If one of them becomes unavailable, Route 53 will try to redirect traffic to another cluster with the lowest latency.
How to set up the solution in AWS console
A configuration in which there are many overlapping dependencies between individual resources is best done from the most basic layer of elements on which subsequent layers of the solution are based. The individual configuration steps are presented below in the following subsections.
Additional health check endpoints
Before we start configuring initial elements, it is crucial to mention a very important thing. In order to configure health checks, we need direct contact with the resource, so that we can be sure that it is available at the exact moment.
Due to the fact that clusters are accessed via a load balancer and the machines that are part of them change constantly, along with the corresponding IP, it is not possible to easily target a given healthcheck straight at a specific address of the machine. Therefore, when designing the infrastructure, an additional five health endpoints were created, which are directly "bound" with the particular loadbalancer connected to the ingress controller of each EKS cluster. Depending on the path the HTTP 2xx status is returned if the application is capable of handling traffic or HTTP 4xx when there is a problem.
For example, endpoints could be created using the following formula:
health-<aws_region_of_the_cluster>.example.com/app1Creating health checks
Having our endpoints that are able to determine the application condition, we can move on to configuring the health checks. We need five of them separately - one for each region where we have our endpoint. The process is analogous, so below there are configuration steps for only one, exemplary health check.
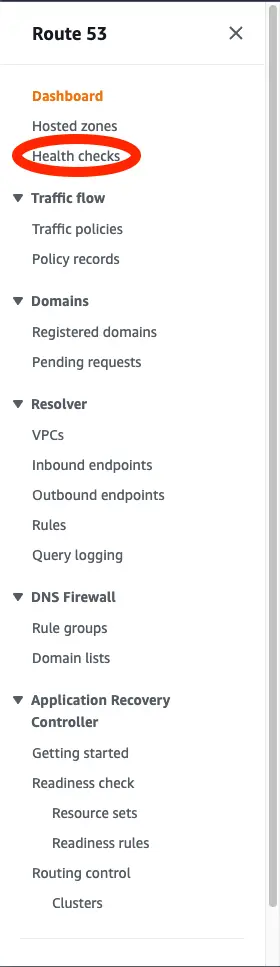
In the top search bar on the AWS dashboard type - Route 53 console. Click on the suggested service and choose as follows:
We choose "Create health check" and configure analogously to what is presented in the screenshot below:
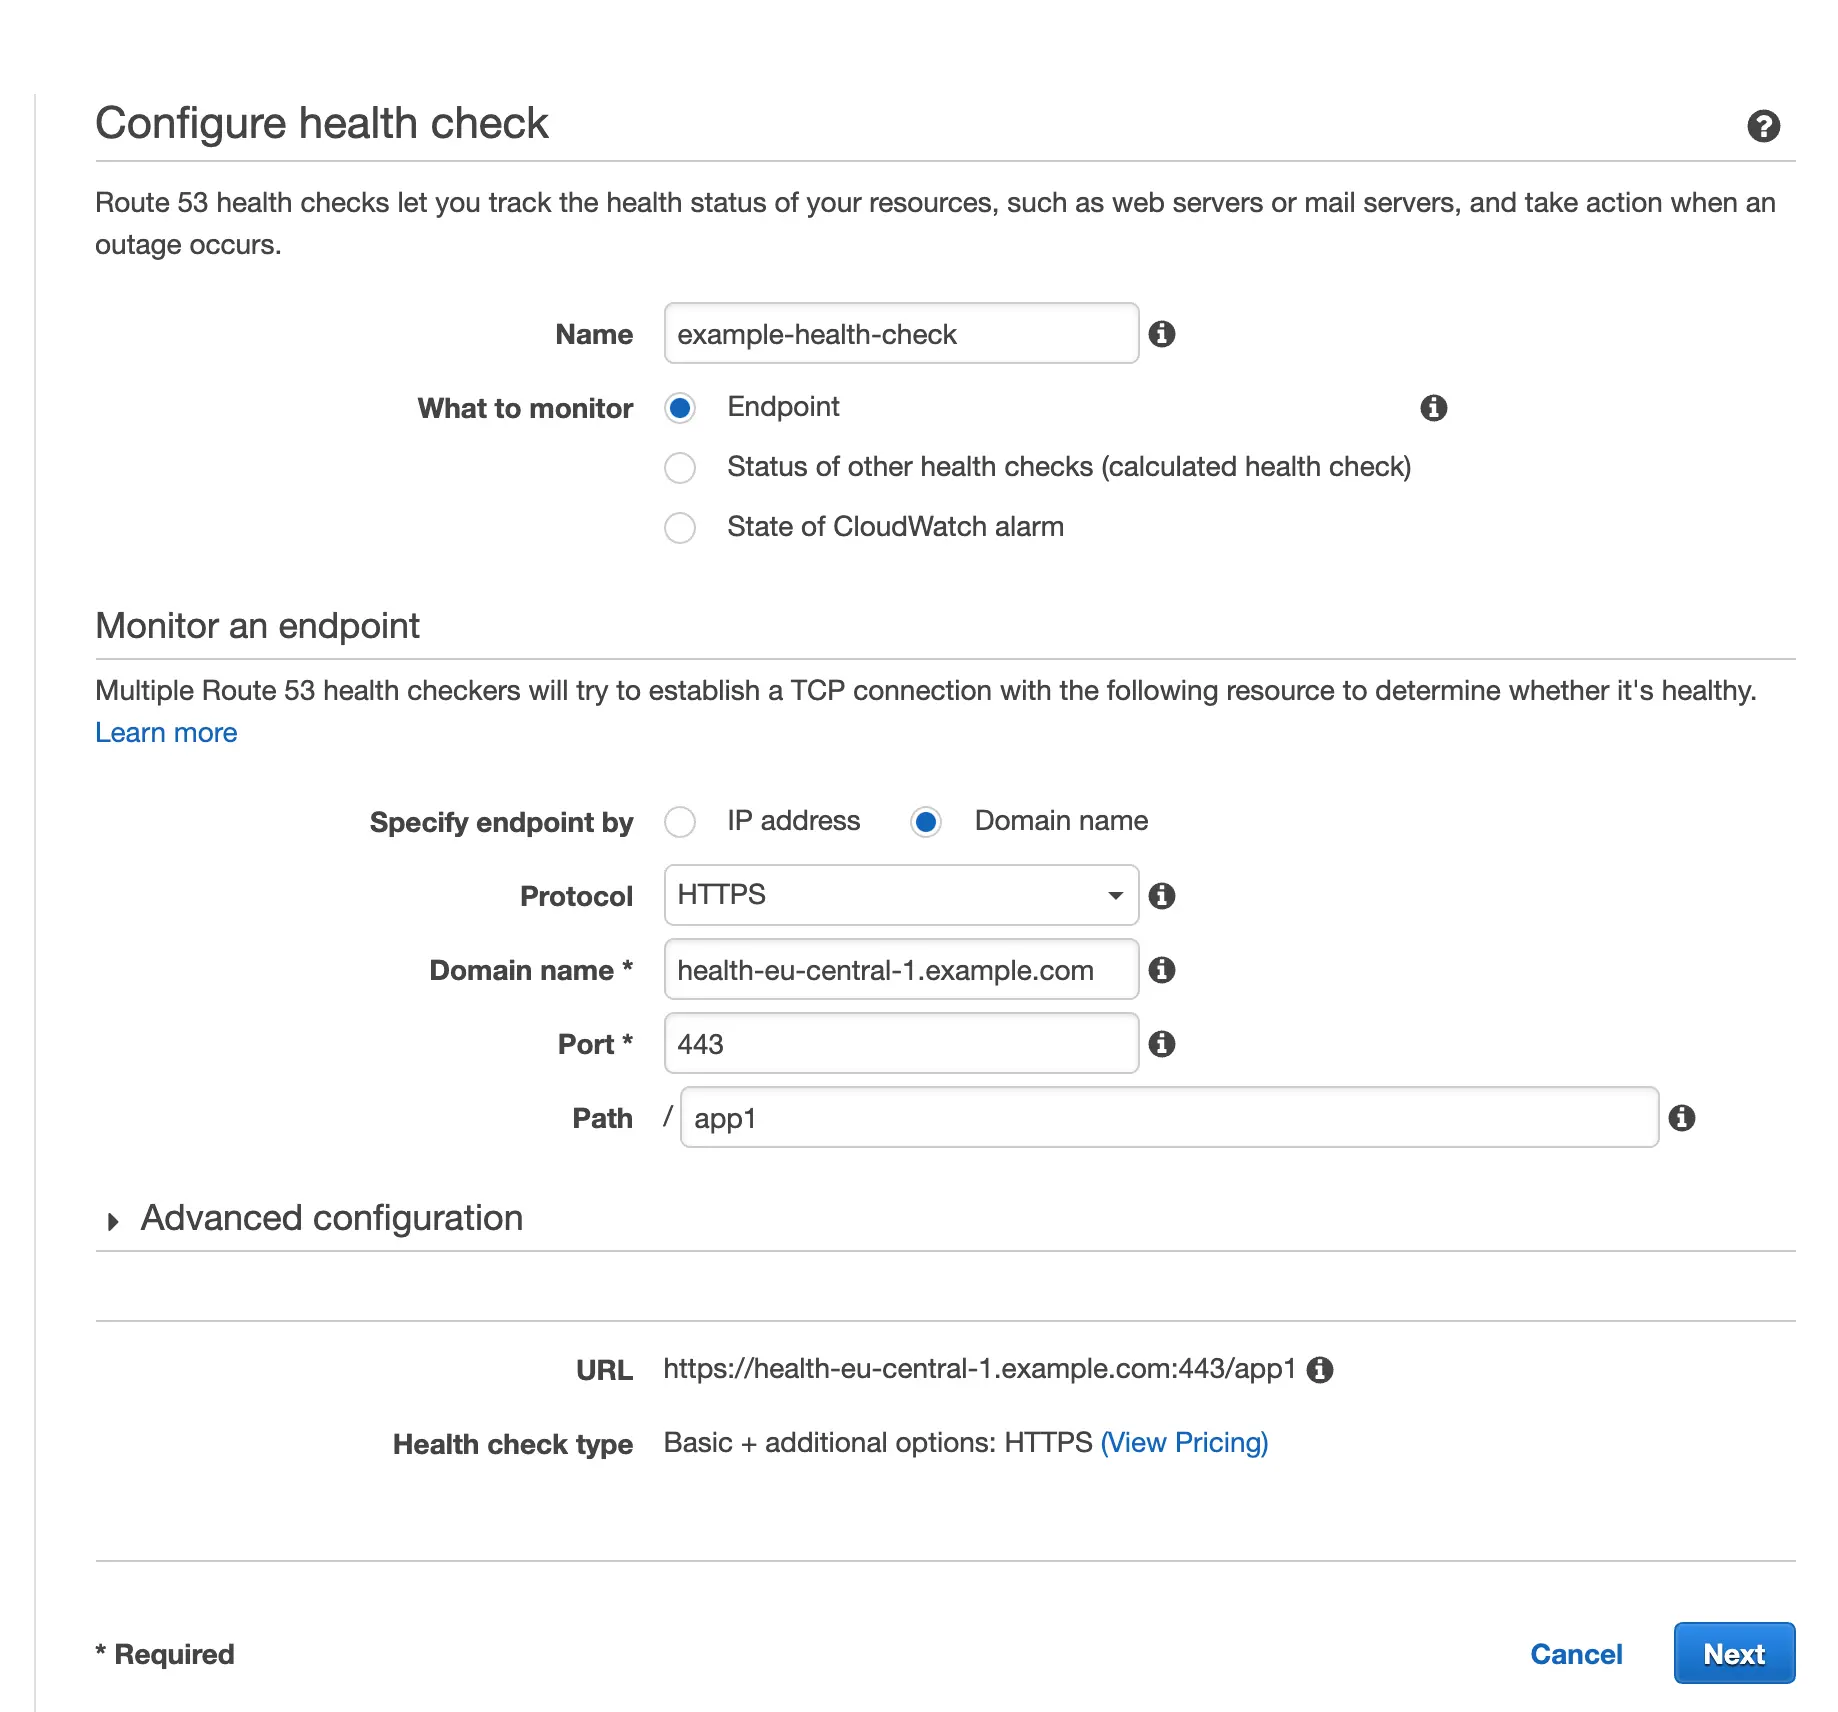
Hit “Next” and in the “Get notified when health check fails” step, tick No and click “Create health check”.
Configuring latency based routing for origin endpoints
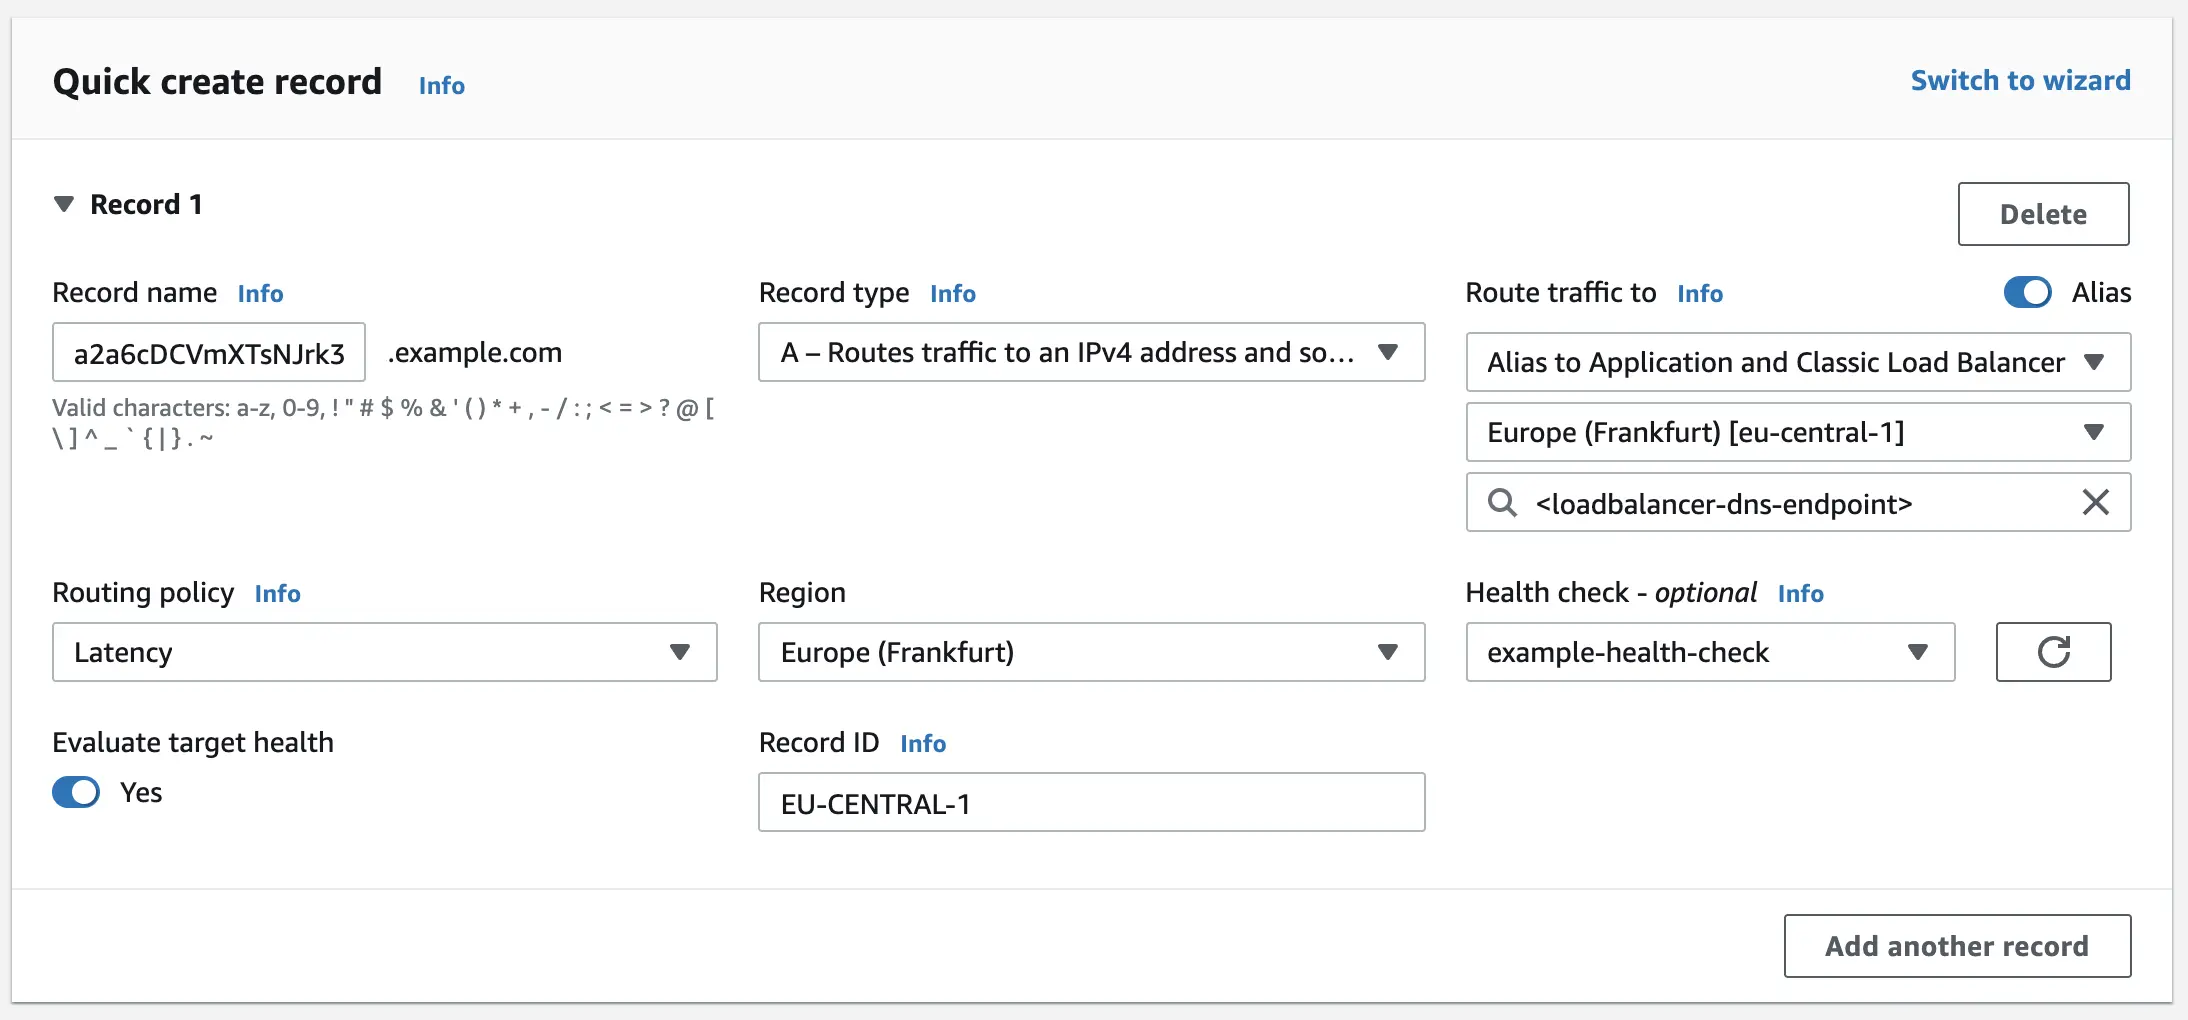
Once we have configured all health checks, we can proceed to creating DNS records for the origin endpoint, which we will use when configuring the CloudFront distribution.
To do this, we go to the Route 53 service again. From the list on the left side we choose "Hosted zone". We click on the zone for which we want to configure our origin record.
If you don't have any hosted zone yet, use the link below to create one:
Creating a public hosted zone - Amazon Route 53
In the Route 53 dashboard, click "Create record" and configure your domain the same way as is shown in the picture below:
IMPORTANT:
- Take note of two very important things. The subdomain in the "record name" field is a randomly generated string. It doesn't matter what the structure of the domain is, however it's better not be easily guessed or similar to any of the well-known domains.
- Record ID, because each latency record has the same domain, we have to set a different identifier for each of them. Thanks to this, Route 53 is able to distinguish them. It doesn't matter what the ID looks like.
For each of the five load balancers, one latency record should be created, similar to the example given.
Configuring CloudFront distribution
Once we have the appropriate endpoints with health checks configured, we are able to proceed to the set up of the CloudFront distribution, which will utilize routing latency. We only create one distribution.
For that, we have to type "CloudFront" in the top search bar in the AWS console. Then click on "Create distribution".
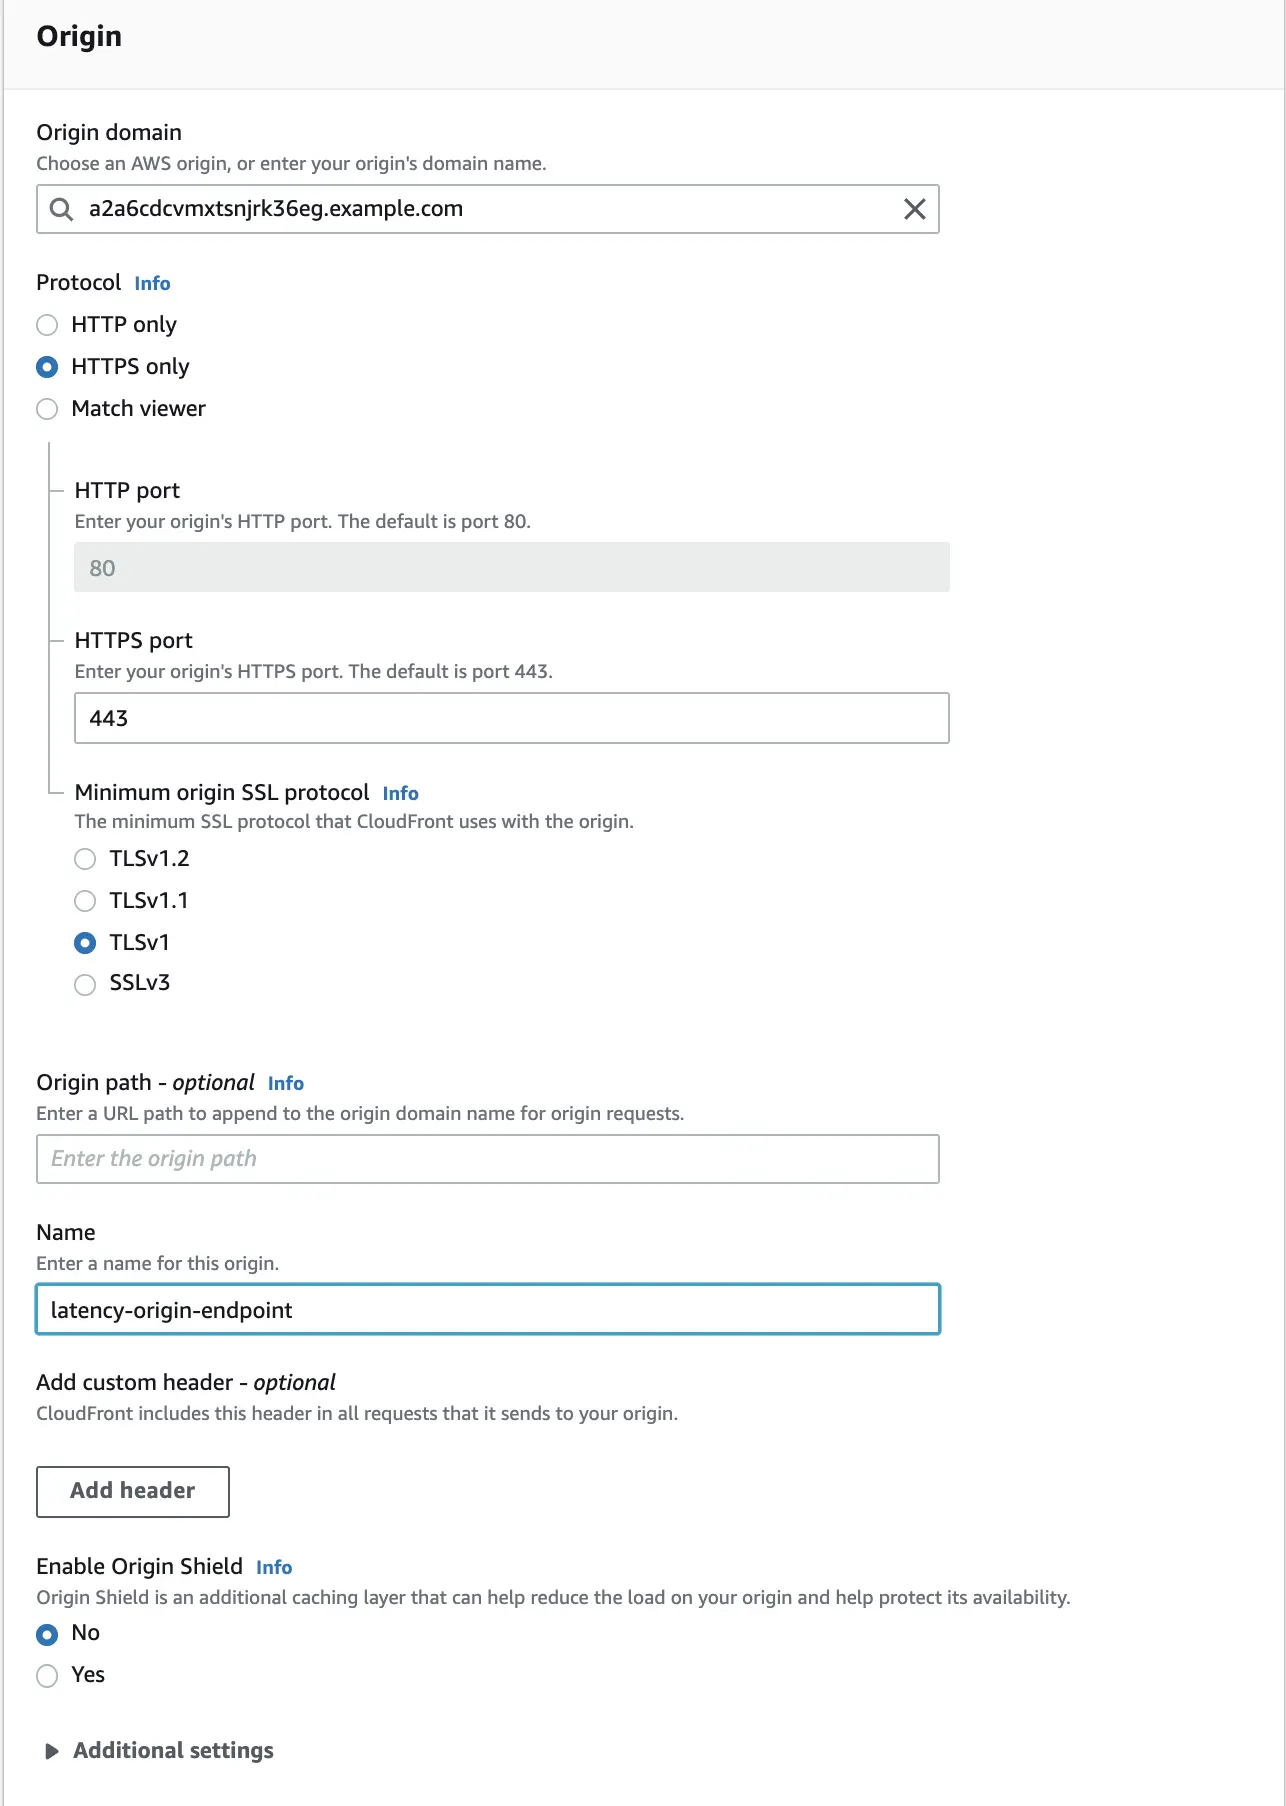
The distribution configuration panel will open, the first section of which will be "Origin". We configure the whole thing in the same way as in the picture below, remembering to enter our own origin domain in the "Origin domain" field. For the "Name" field, we can use any string.
The next configuration section is “Default cache behavior”. We configure it as follows:
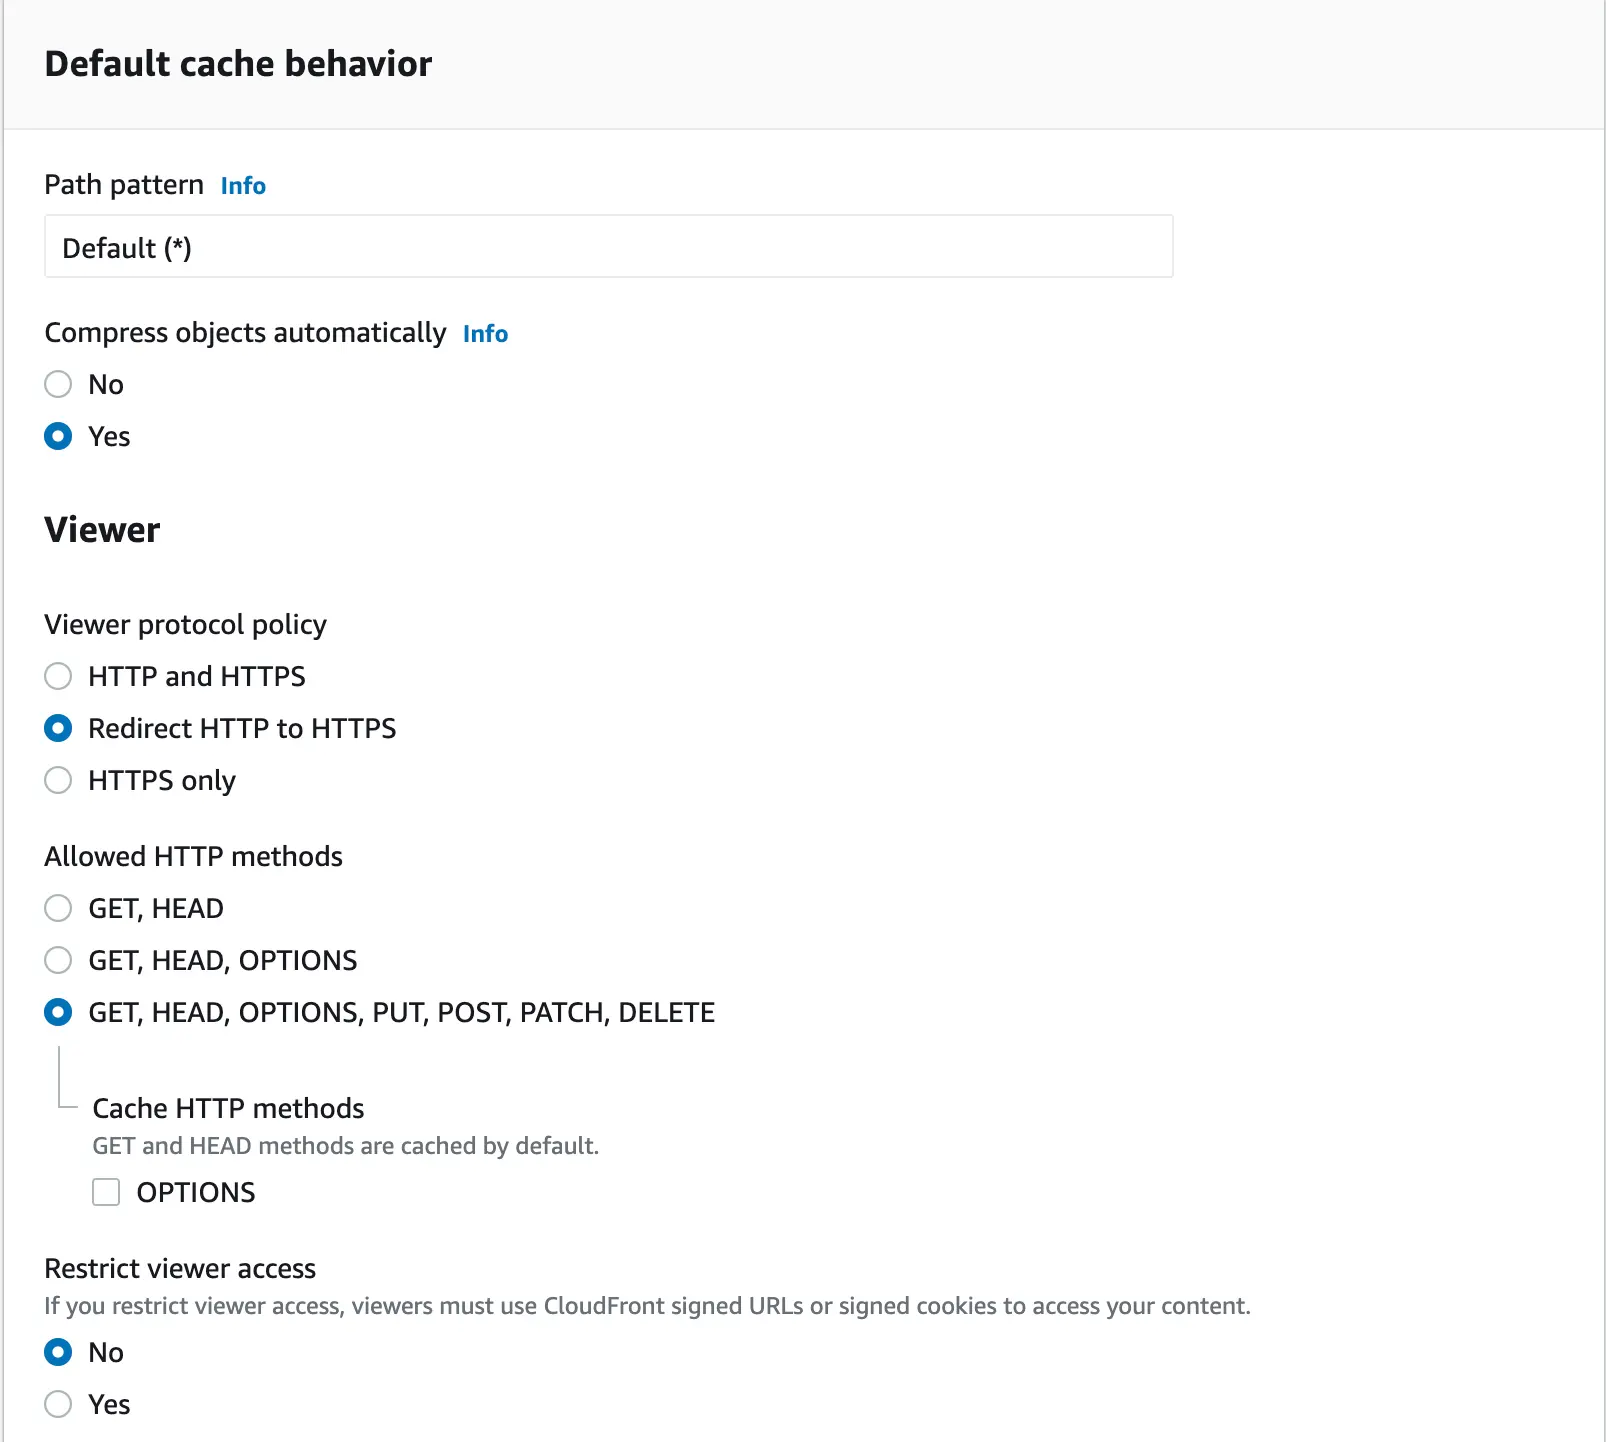
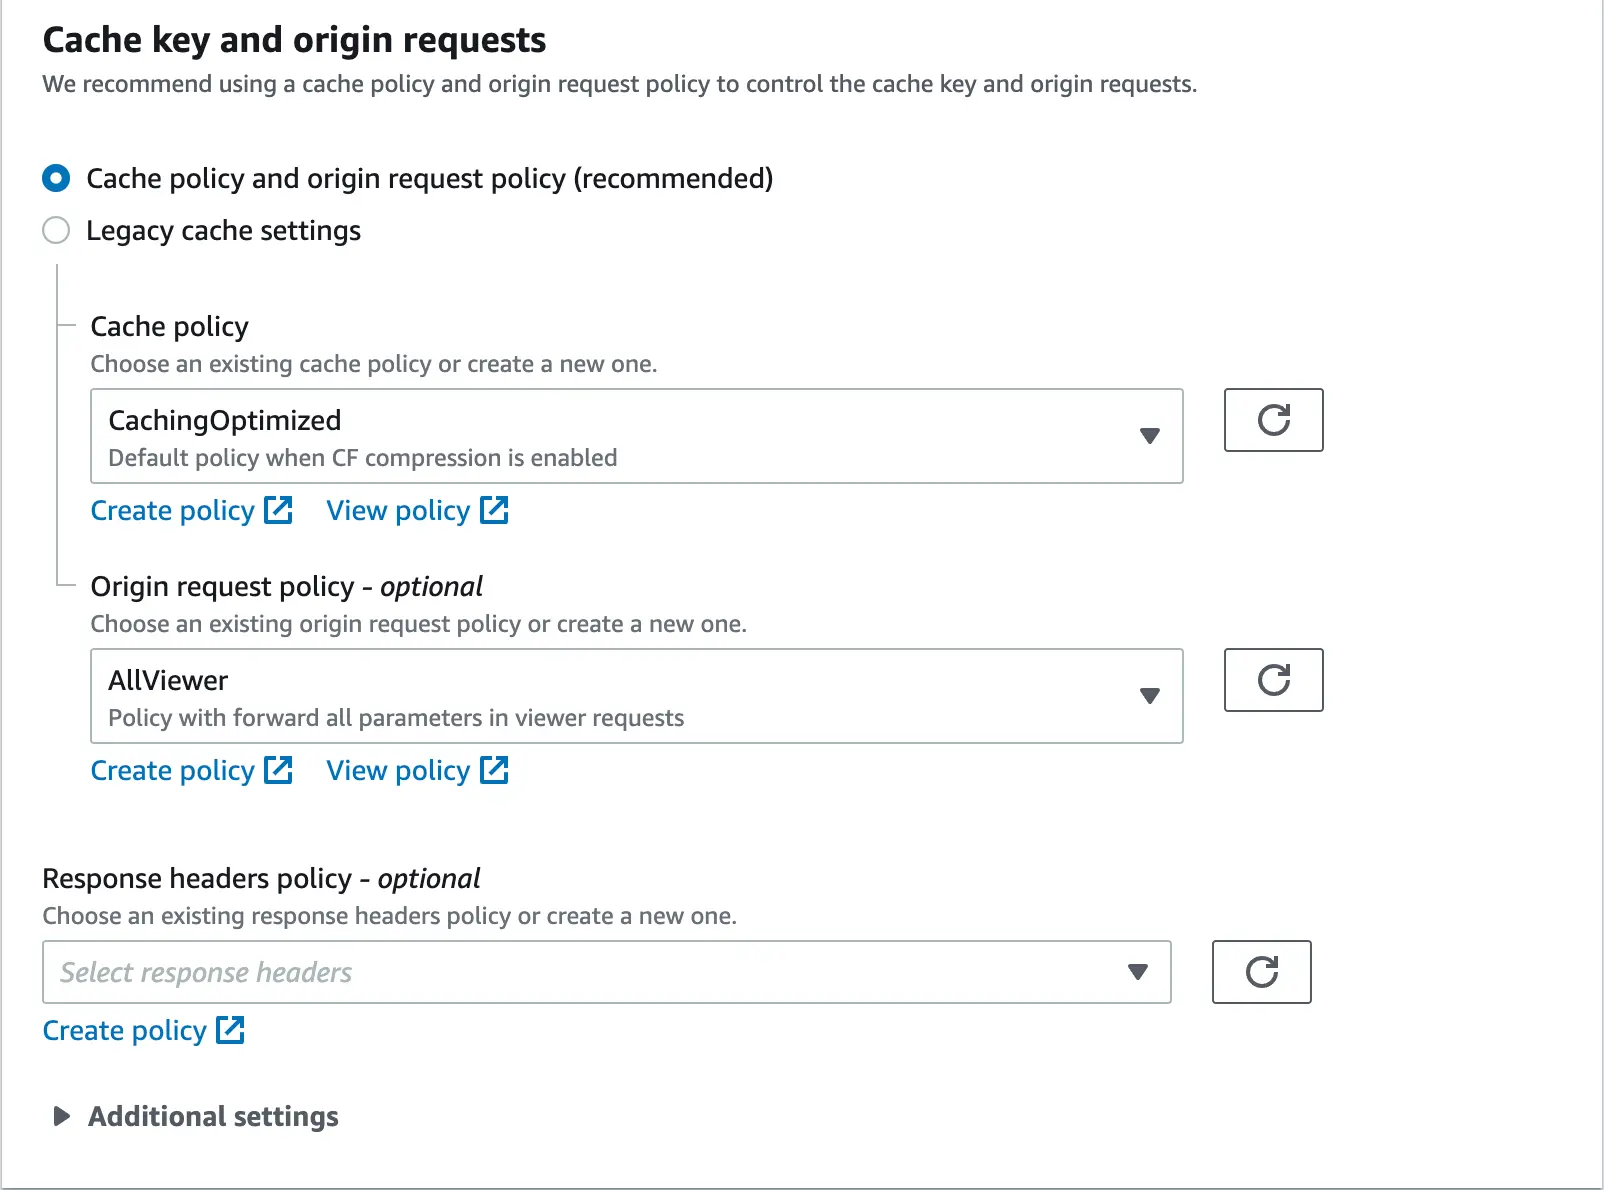
We skip the optional "Function associations" section and go straight to configuring the "Settings" zone. The whole thing should look similar to what is presented below:
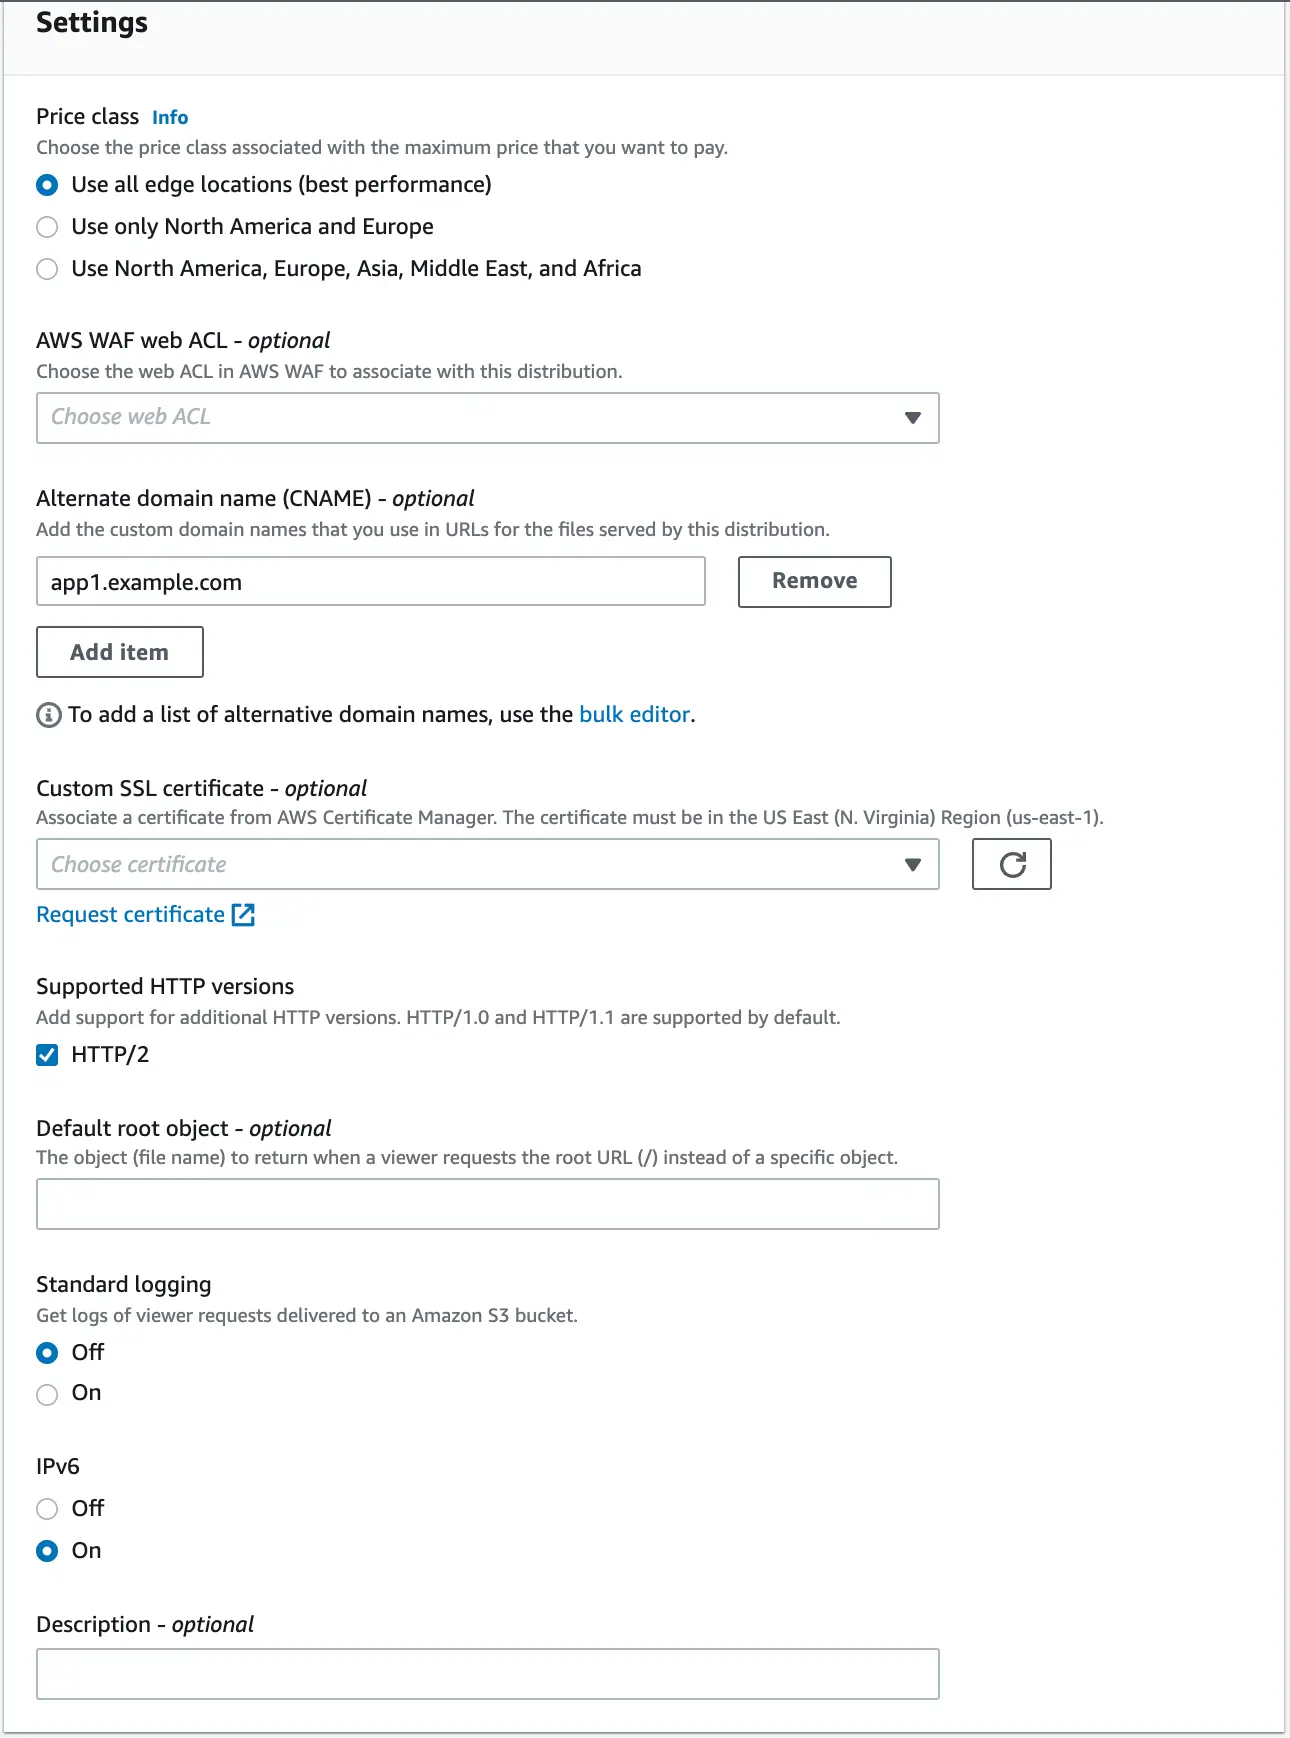
IMPORTANT:
- The "Use all edge locations" option is the most expensive available in CloudFront. If you know that you will not need such detailed granularity of the regions, it is recommended to use the cheaper option.
- In the field "Alternate domain name" we configure our own domain. All requests targeted to it, are going to be redirected to the distribution, hence CloudFront itself must be able to recognize it.
“Custom SSL certificate” as we configure our own alternative domain for CloudFront distribution and in the assumption we want the traffic to be sent via HTTPS, we must configure our own certificate in this field, which must be issued for the domain that complies with what we configured in the "Alternate domain name" field . The certificate is selected from those that we have created or imported into the ACM service. For detailed information on creating or importing a certificate in ACM, go to the link below.
Remember that your ACM certificate must be located in the us-east-1 region for CloudFront to be able to use it.
When all the required options have been marked and the fields are filled in, click "Create distribution".
Creating a basic alias record for our CloudFront distribution
The last step will be to create a basic alias record in our hosted zone in Route 53. This record will have exactly the same domain as what we configured in the “Alternate domain name” field in the previous step.
To create an additional record, we must again go to our hosted zone in AWS Route 53. From the panel level, click "Create record". Then we configure the whole thing analogously to what is presented below.
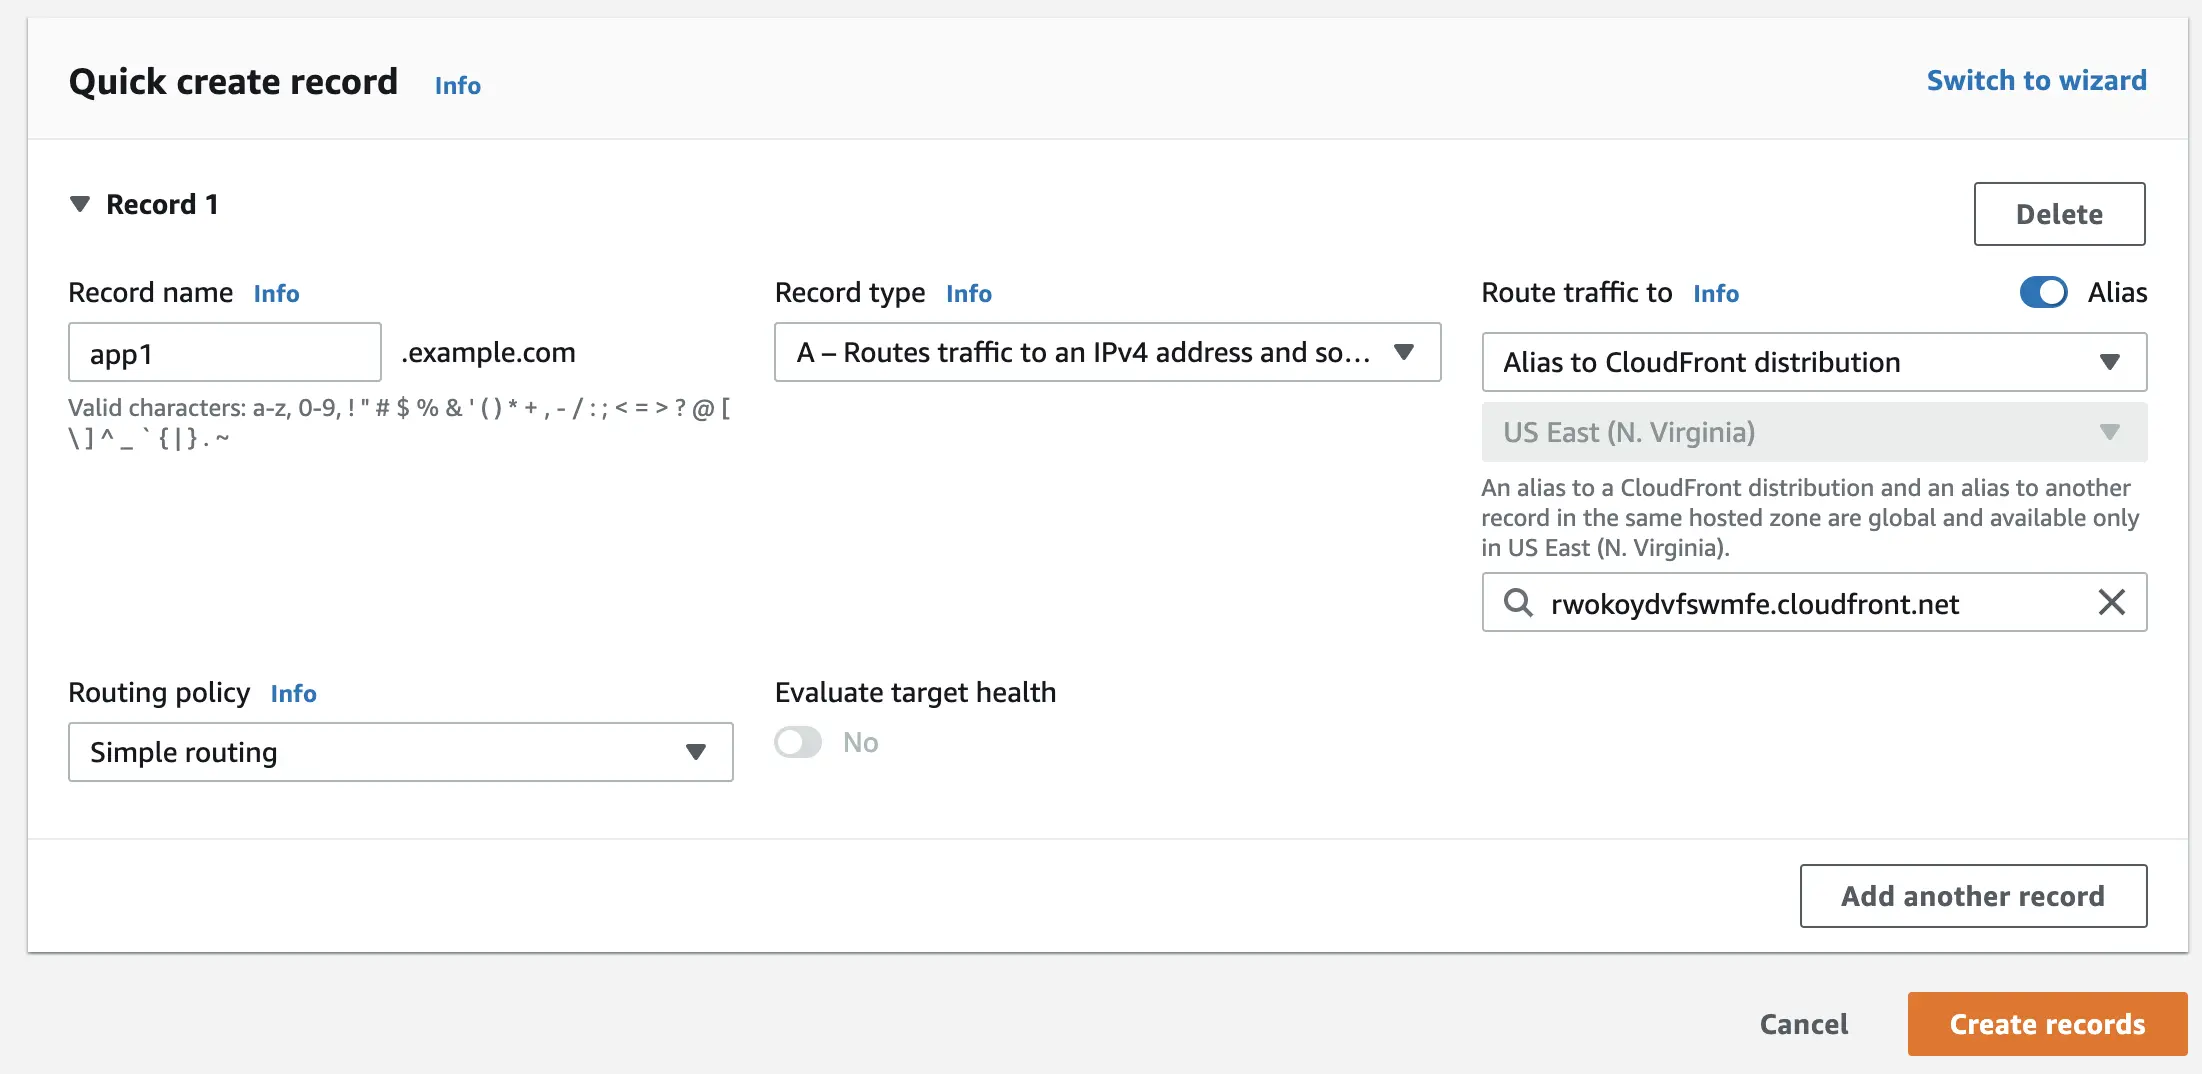
When everything is properly filled up, click the "Create record" button.
In this way, we obtain a fully complete, highly available and multi-regional set up of our application.
It’s all about breaking down a problem into its core elements
To sum up, the seemingly complicated problem, after a moment of reflection and breaking it down into prime factors, turned out to be possible to solve. At the same time, it allows for the development of a really interesting approach that lets you implement some additional benefits as well as significantly improves the operation of the application.