Github Actions with self-hosted runners on AWS

GitHub Actions is a very useful tool for building, testing and deploying apps. But it's also very handy when it comes to automating all your software workflows, including top of the range CI/CD. GitHub Actions jobs are run in the cloud by default, but you may want to run your jobs in your environment. In this blog post I will talk you through using self-hosted runners on AWS and highlight the key differences between spot instances and k8 runners. But first of all let's start with an important definition.
What are self-hosted runners in Github Actions?
GitHub Actions self hosted runners provide a flexible option to run CI workloads on infrastructure of your choice. Currently there is no option provided to automate the creation and scaling of action runners.
GitHub-hosted runners offer a quicker, simpler way to run your workflows, while self-hosted runners are a highly configurable way to run workflows in your own custom environment. Let’s look at some of the key comparisons between the two.
GitHub-hosted runners:
- Receive automatic updates for the operating system, preinstalled packages and tools, and the self-hosted runner application.
- Are managed and maintained by GitHub.
- Provide a clean instance for every job execution.
- Use free minutes on your GitHub plan, with per-minute rates applied after surpassing the free minutes.
Self-hosted runners:
- Receive automatic updates for the self-hosted runner application only. You are responsible updating the operating system and all other software.
- Can use cloud services or local machines that you already pay for.
- Are customizable to your hardware, operating system, software, and security requirements.
- Don't need to have a clean instance for every job execution.
- Are free to use with GitHub Actions, but you are responsible for the cost of maintaining your runner machines.

What are the main benefits of using self-hosted runners?
Base runners from Github have following resources:
- 2-core CPU
- 7 GB of RAM memory
- 14 GB of SSD disk space
By using self hosted runners we can specify resources on our own.
Self-hosted runners can be used for such use cases, but they require the provisioning and configuration of a virtual machine instance. For example, if you already have a Kubernetes cluster, it makes more sense to run the self-hosted runner on top of it.
We’ll focus on 2 different solutions:
- Self-hosted runners on Kubernetes stack
- Self-hosted runners as spot-instances in AWS
Self-hosted runners on Kubernetes stack
How do you install self-hosted runners on a Kubernetes stack?
The actions-runner-controller uses cert-manager for the certificate management of Admission Webhook. It’s worth ensuring that you’ve installed cert-manager before you begin. Install the custom resource and actions-runner-controller with kubectl or helm. This will create actions-runner-system namespace in your Kubernetes and deploy the required resources.
kubectl:
# REPLACE "v0.17.0" with the version you wish to deploy
kubectl apply -f https://github.com/summerwind/actions-runner-controller/releases/download/v0.17.0/actions-runner-controller.yaml
helm:
helm repo add actions-runner-controller https://summerwind.github.io/actions-runner-controller
helm upgrade --install -n actions-runner-system actions-runner-controller/actions-runner-controller
How do you set up authentication using GitHub API?
You can set up authentication using GitHub API either by using the GitHub app or through the use of personal access tokens.
You might choose to use the GitHub App due to the fact that it gives you an increased API quota.
Launching a single self-hosted runner
You should begin by creating a manifest file which includes a Runner resource. In the below example from GitHub, a self-hosted runner is launched with the name example-runner for the summerwind/actions-runner-controller repository.
# runner.yaml
apiVersion: actions.summerwind.dev/v1alpha1
kind: Runner
metadata:
  name: example-runner
spec:
  repository: summerwind/actions-runner-controller
  env: []
Apply the created manifest file to your Kubernetes.
$ kubectl apply -f runner.yaml
runner.actions.summerwind.dev/example-runner created
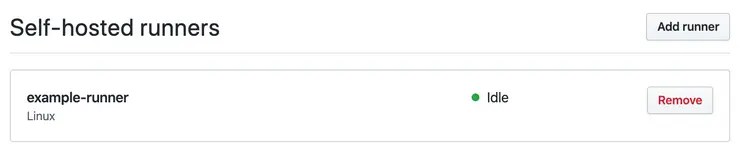
Here you have the runner resource.
$ kubectl get runners
NAME             REPOSITORY                             STATUS
example-runner   summerwind/actions-runner-controller   Running
You can see the functioning runner pod.
$ kubectl get pods
NAME           READY   STATUS    RESTARTS   AGE
example-runner 2/2     Running   0          1m
The runner you created has been registered to your repository.
Now it’s ready for you to use!
Adding the runner to an organization
Adding a runner to your organization is simple. All you need to do is to replace the repository field with organization.
You’ll then be able to view the runner on the organization level (but make sure that you have the right permissions).
What do you need to know about Runner deployments?
In most cases, you will only need RunnerDeployment rather than RunnerReplicaSet as the former is for managing the latter.
# runnerdeployment.yaml
apiVersion: actions.summerwind.dev/v1alpha1
kind: RunnerDeployment
metadata:
  name: example-runnerdeploy
spec:
  replicas: 2
  template:
    spec:
      repository: mumoshu/actions-runner-controller-ci
      env: []
Apply the manifest file to your cluster:
$ kubectl apply -f runner.yaml
runnerdeployment.actions.summerwind.dev/example-runnerdeploy created
You can see that 2 runners have been created as specified by replicas: 2:
$ kubectl get runners
NAME                             REPOSITORY                             STATUS
example-runnerdeploy2475h595fr   mumoshu/actions-runner-controller-ci   Running
example-runnerdeploy2475ht2qbr   mumoshu/actions-runner-controller-ci   Running
Self-hosted runners as spot-instances in AWS
This module takes care of creating the AWS infrastructure to host action runners on spot instances. It provides lambda modules to orchestrate the life cycle of the action runners.
Lambda is chosen as runtime for two major reasons. First it allows you to create small components with minimal access to AWS and GitHub. Secondly it provides a scalable setup with minimal costs that works on repo level and scales to organization level. The lambdas will create Linux based EC2 instances with Docker to serve CI workloads that can run on Linux and/or Docker. The main goal is to support Docker based workloads.
A logical question would be why not Kubernetes? In the current approach we stay close to the way the GitHub action runners are available today. The approach is to install the runner on a host where the required software is available. With this setup we stay quite close to the current GitHub approach. Another logical choice would be AWS Auto Scaling groups. This choice would typically require much more permissions on instance level to GitHub. And besides that, scaling up and down is not trivial.
How to set up self-hosted runners
When a GitHub action workflow which needs a self-hosted runner is triggered, GitHub will look for a runner that can take on the workload. In doing so, it reacts to GitHub's check_run event for the triggered workflow. A new runner is created if needed.
You then need to create a GitHub App with a webhook which will receive the check_run event.
In AWS a API gateway endpoint is created which can receive the GitHub webhook events via HTTP post. The gateway triggers the webhook lambda which will verify the signature of the event. This check guarantees the event is sent by the GitHub App. The lambda only handles check_run events with status created. The accepted events are posted on a SQS queue.
The "scale up runner" lambda is listening to the SQS queue and picks up events. The lambda runs various checks to decide whether a new EC2 spot instance needs to be created. For example, the instance is not created if the build is already started by an existing runner, or the maximum number of runners is reached.
How does Lambda work?
The Lambda first requests a registration token from GitHub which is needed later by the runner to register itself. This avoids that the EC2 instance, which later in the process will install the agent, needs administration permissions to register the runner. Next the EC2 spot instance is created via the launch template. The launch template defines the specifications of the required instance and contains a user_data script. This script will install the required software and configure it. The registration token for the action runner is stored in the parameter store (SSM) from which the user data script will fetch it and delete it once it has been retrieved. Once the user data script is finished the action runner should be online and the workflow will start in seconds.
Scaling down the runners is at the moment brute-forced, every configurable amount of minutes a lambda will check every runner (instance) if it is busy. In case the runner is not busy it will be removed from GitHub and the instance terminated in AWS. At the moment there seems no other option to scale down more smoothly.
Downloading the GitHub Action Runner distribution can be occasionally slow (more than 10 minutes). Therefore a lambda is introduced that synchronizes the action runner binary from GitHub to an S3 bucket. The EC2 instance will fetch the distribution from the S3 bucket instead of the internet.
Secrets and private keys which are passed to the lambdas as environment variables are encrypted by default by a KMS key managed by the module. Alternatively you can pass your own KMS key. Encryption via KMS can be complete disabled by setting encrypt_secrets to false.
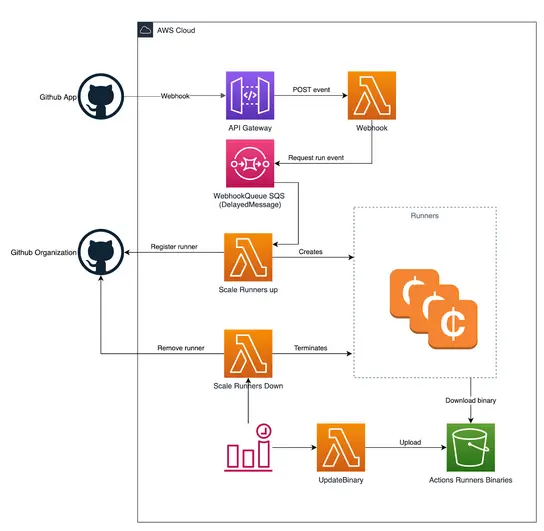
Remember that permissions need to be managed in various places. Firstly, the GitHub App needs access to actions and publish check_run events to AWS. Secondly, both the scale up and scale down lambda should have access to EC2. Both lambdas should also have permission to access CloudWatch, SSM and S3.
What are the two main scenarios for creating runners?
The first scenario is on a repository level - here a runner will be dedicated to only one repository and no others can use it.
The second scenario is on an organization level, where you can use the runner(s) for all the repositories within the organization.
Note that GitHub workflows fail immediately if there is no action runner available for your builds. Builds will fail if you don’t have an active runner available. You should therefore create an offline runner with matching labels to the configuration.
The setup consists of running Terraform to create all AWS resources and manually configuring the GitHub App. The Terraform module requires configuration from the GitHub App and the GitHub app requires output from Terraform. Therefore you first create the GitHub App and configure the basics, then run Terraform, and afterwards finalize the configuration of the GitHub App.
How do you begin setting up your GitHub app?
Start off by creating a new app in GitHub. When asked to choose between creating an app for your organization or your user, choose organization.
Here are the points that you should go through:
- Create app in Github
- Select the name
- Select a website
- Disable the webhook. Note that this will be configured at a later stage.
- Permissions for all runners:
- Repository: Actions: Read-only (check for queued jobs), Checks: Read-only (receive events for new builds)
- Metadata: Read-only (default/required), Permissions for repo level runners only: Repository, Administration: Read & write (to register runner)
- Permissions for organization level runners only: Organization, Administration: Read & write (to register runner)
- Self-hosted runners: Read & write (to register runner)
- Save the new app.
- On the General page, make a note of the "App ID" and "Client ID" parameters.
- Create a new client secret and also write it down.
- Generate a new private key and save the app.private-key.pem file.
Setting up your terraform module
To apply the terraform module, the compiled lambdas (.zip files) need to be available either locally or in an S3 bucket. They can be either downloaded from the GitHub release page or build locally.
To read the files from S3, set the lambda_s3_bucket variable and the specific object key for each lambda.
The lambdas can be downloaded manually from the release page or using the download-lambda terraform module (requires curl to be installed on your machine). In the download-lambda directory, run terraform init && terraform apply. The lambdas will be saved to the same directory.
For local development you can build all the lambdas at once using .ci/build.sh or individually using yarn dist.
Service-linked role
To create spot instances the AWSServiceRoleForEC2Spot role needs to be added to your account. You can do that manually by following the AWS docs. To use terraform for creating the role, either add the following resource or let the module manage the the service linked role by setting create_service_linked_role to true. Be aware this is an account global role, so maybe you don't want to manage it via a specific deployment.
Continuing your setup
Now, go back to your GitHub App and do the following:
- Enable the webhook.
- Provide the webhook url, should be part of the output of terraform.
- Provide the webhook secret.
- Enable the check_run event for the webhook.
- In the "Install App" section, install the App in your organization, either in all or in selected repositories.
You are now ready to run action workloads on a self hosted runner.
In conclusion
Running both solutions in different use cases are great. At low cost we can have customized self-hosted runners and bypass the hardware spec set delivered by default GitHub runners and monthly time usage limits.