Vue 3 has just been released, so if you haven’t had a chance to familiarize yourself with the new version of the framework, now is the time to do so by creating the same app in Vue 2 and Vue 3.
This is exactly what I did when the new version was still in RC (Release Candidate). I’m a big fan of learning through doing, which is why I wanted to share my knowledge with you by creating a small app based on a concept put forward by one of our designers.
In the below walk-through, I will be creating the same app in Vue 2 and Vue 3 to give you a better understanding of some of the new features, as well as give you a chance to see how the two versions of the frameworks differ. It doesn’t use everything that is available in Vue 3, but I wanted to make it approachable and to give you a solid start so that you can explore further on your own.
I will guide you through it step by step while comparing parts of the codebase in Vue 2 and Vue 3.
Technical introduction

I mainly focused on the new Composition API and some other features like Suspense, Teleport and multiple v-models to show you as much as it’s possible at this stage, but the Vue 3 app that I will show is written in TypeScript.
I will give you access to both Vue 3 with and without TypeScript repositories so that you can choose your approach.
For the Vue 2 app I used vue 2.6.11 and vue-router 3.3.4.
For the Vue 3 app I used vue 3.0.0, vue-router 4.0.0-beta.11 and vue-cli-plugin-vue-next 0.1.4 to make Vue 3 features available, since I was creating this app when it was still in RC. It’s important to mention that I created this version of the app with `vue create` command and selected TypeScript support.
Other libraries include: axios 0.19.2, chart.js 2.9.3 and vue-chartjs 3.5.0.
If you’re familiar with Vue 3 concepts and you would like to go straight to my GitHub repositories, please find the links to them below. There are README files there so that you can get the project up and running yourself.
Step by step guide
Setup
For both versions, create a new project with vue create <your-project-name>. Select what you need and if you want to use Vue 3, you should have such option in newest Vue-CLI. You can read more about this here.For Vue 3 you can select TypeScript if you want.
If you'd like to check Vue in its RC stage or you don't have newest Vue-CLI, take a look below at alternative setups.
- Install vue-cli-plugin-vue-next through the Vue Dashboard. You can open it by writing vue ui in the command line, import your project and then install a new plugin.
- Use vue add vue-next command on an existing Vue 2 project.
Then, you might have to update the package versions as the plugin may install previous ones. Take a look at this page, and this one for the current versions.
Project structure
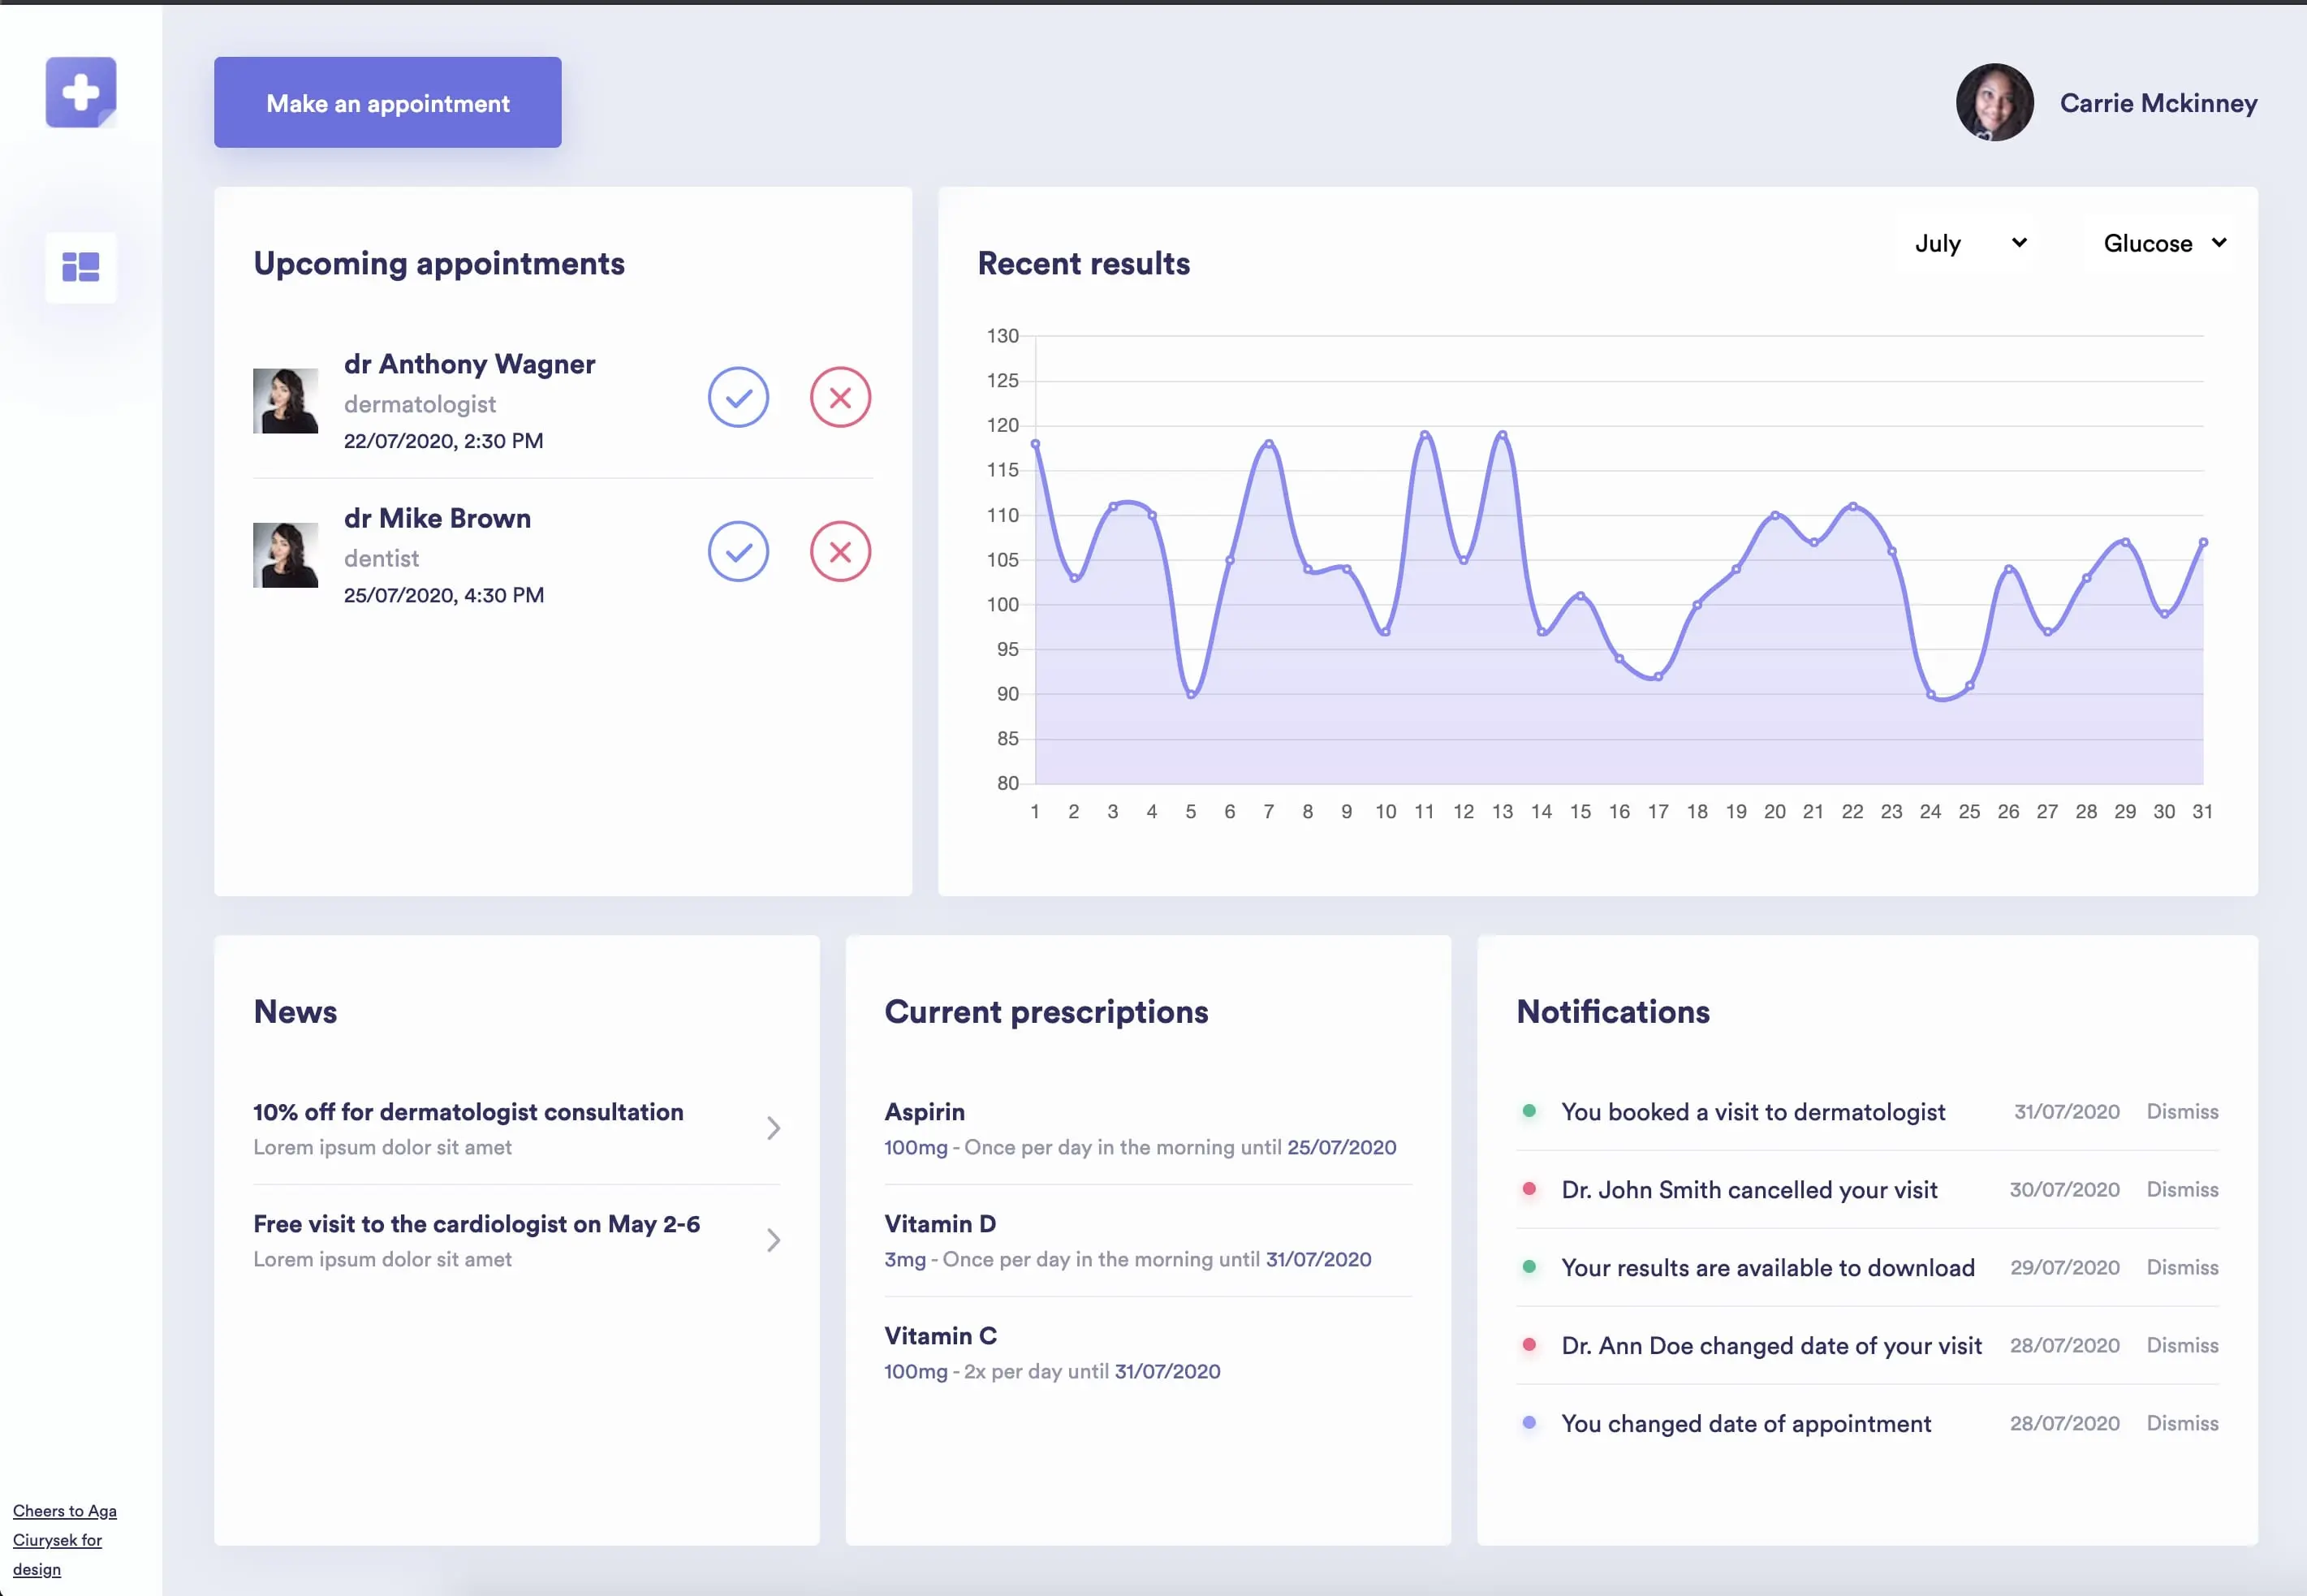
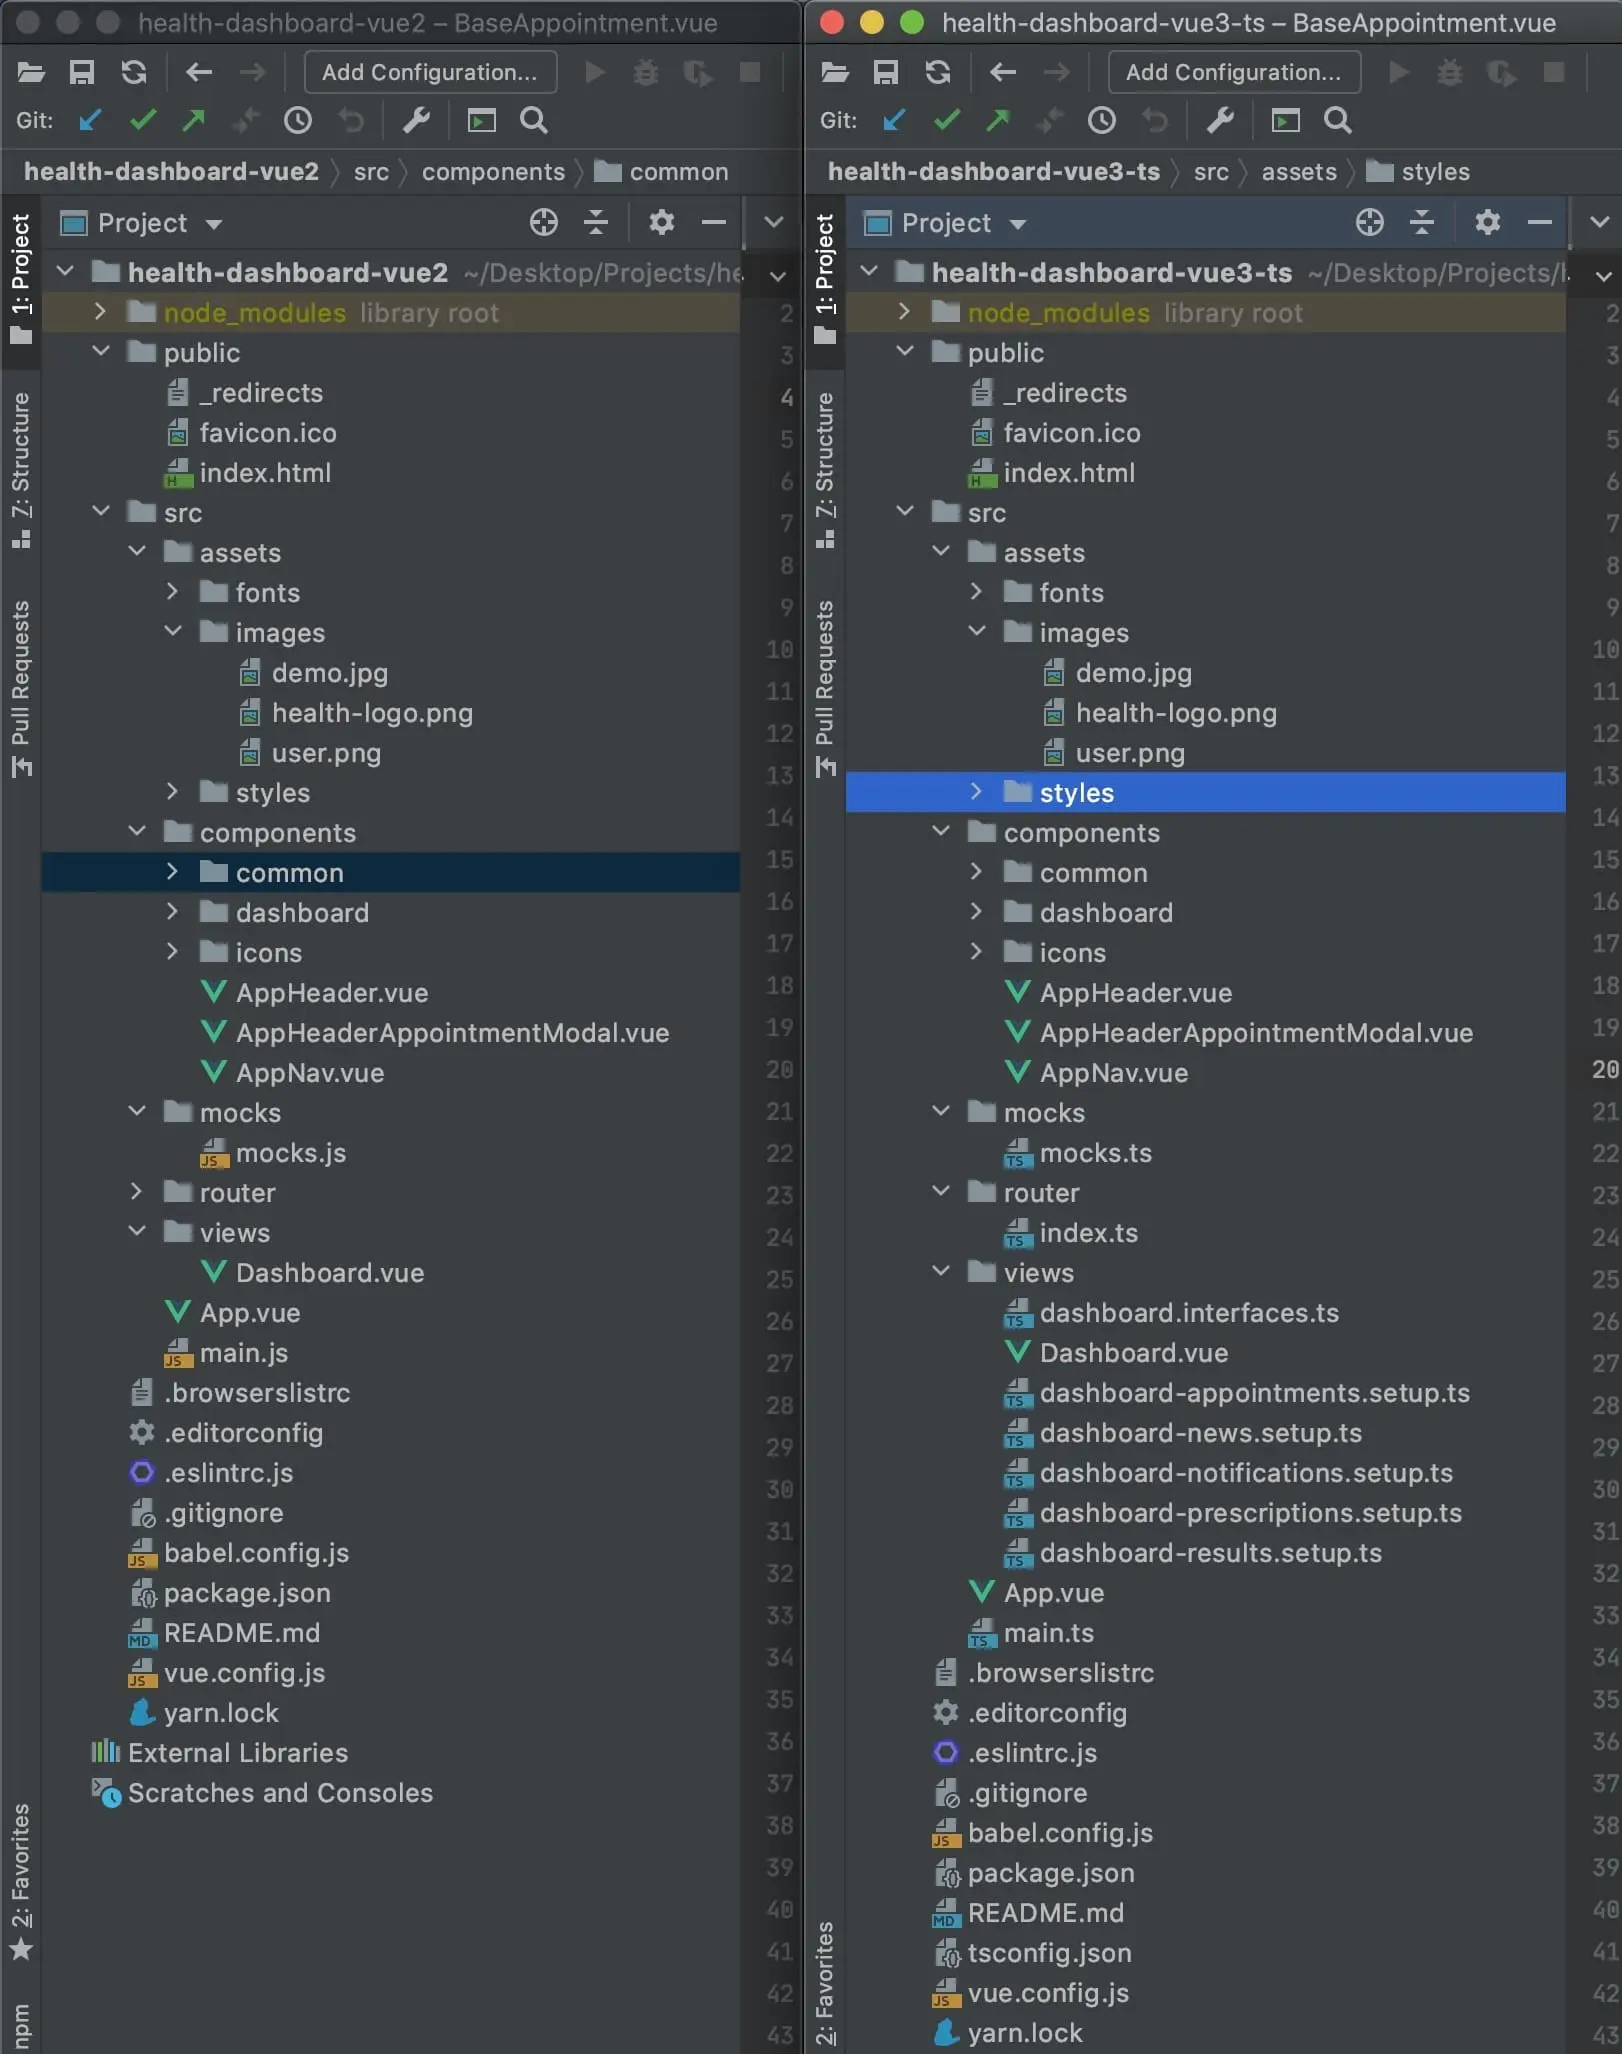
On the image below you can take a look at the file structure to combine it with what you can see on the app screenshot and better understand what’s going on. There are new files in the views folder to separate functions going into Dashboard setup and a file for interfaces used across Dashboard components.
The project structure could have easily been the same, but I wanted to move some part of the business logic out of Dashboard.vue to better show you the separation.

Fetching user data
In Vue 3 I used Suspense on Dashboard.vue level to show loading of the app. As you will see below, Suspense found out that some asynchronous action is going on below in the tree (AppHeader.vue) and renders the fallback version of template which includes loading indicator when user has not yet been fetched.
In Vue 2 I used a simple loading data key that I changed before and after I fetched user information.
// Vue 2
// App.vue

<template>
  <div id="app" class="app">
    <template v-if="!loading">
      <AppNav class="app__nav"></AppNav>
      <main class="app__main">
        <router-view
          :user="user"
          class="app__router-view"
        />
      </main>
    </template>
    <template v-else>
      <div class="app__loading">Loading...</div>
    </template>
  </div>
</template>

<script>
  import axios from 'axios';
  import AppNav from '@/components/AppNav.vue';

  export default {
    name: 'App',
    components: {
      AppNav,
    },
    data() {
      return {
        loading: false,
        user: {
          photo: null,
          name: null
        }
      }
    },
    async mounted() {
      this.loading = true;
      const { data } = await axios.get('https://randomuser.me/api/');
      this.loading = false;

      this.user = {
        photo: data.results[0].picture.thumbnail,
        name: `${data.results[0].name.first} ${data.results[0].name.last}`
      }
    }
  };
</script>

// part of AppHeader.vue

<template>
  <!-- ... -->
  <div class="app-header__user">
    <img :src="user.photo" alt="User image">
    <span>
      {{ user.name }}
    </span>
  </div>
  <!-- ... -->
</template>

<script>
  export default {
    // ...
    props: {
      user: {
        type: Object,
        default: () => ({})
      }
    }
    // ...
  }
</script>
// Vue 3
// part of Dashboard.vue

<template>
  <div class="dashboard">
    <Suspense>
      <div class="dashboard__content">
        <AppHeader
          class="dashboard__header"
          @submit-appointment="appointments.handleSubmitAppointment"
        ></AppHeader>
        <Teleport to="#news-modal">
        ...
        </Teleport>
      </div>
      <template #fallback>
        <div class="dashboard__loading">Loading...</div>
      </template>
    </Suspense>
   </div>
</template>

// part of AppHeader.vue

<template>
  <!-- ... -->
  <div class="app-header__user">
    <img :src="state.user.photo" alt="User image">
    <span>
      {{ state.user.name }}
    </span>
  </div>
  <!-- ... -->
</template>

<script>
  // ...
  export default defineComponent({
    async setup() {
      const state = reactive<State>({
        user: {
          name: null,
          photo: null
        }
      });

      const { data } = await axios.get('https://randomuser.me/api/');

      state.user = {
        photo: data.results[0].picture.thumbnail,
        name: `${data.results[0].name.first} ${data.results[0].name.last}`
      }

      const returnData: AppHeaderReturnData = {
        state,
        // ...
      }

      return {...returnData};
    }
  })
</script>
As you can see already, in Vue 3 I use defineComponent, which is needed for TypeScript support as I found out. I didn't have to use it in the version without TypeScript, so feel free to dig deeper as Vue 3 is totally new at this point.
AppHeader
In Vue 3 I decided to go for Teleport for a modal that creates a new appointment with a doctor. I also created an async setup here to show you how to fetch something in a component while previously mentioned Suspense in Dashboard.vue takes care of the rest.
In Vue 2, AppHeader is more presentational as more is going on in App.vue itself.
// Vue 2
<template>
  <header class="app-header">
    <div
      v-if="modalOpen"
      class="modal"
    >
      <AppHeaderAppointmentModal
        @close="handleCloseModal"
        @submit="handleEmitAppointment"
      />
    </div>
    <BaseButton @click.native="handleOpenAppointmentModal">
      Make an appointment
    </BaseButton>
    <div class="app-header__user">
      <img :src="user.photo" alt="User image">
      <span>
        {{ user.name }}
      </span>
    </div>
  </header>
</template>

<script>
  import AppHeaderAppointmentModal from './AppHeaderAppointmentModal';
  import BaseButton from './common/BaseButton';

  export default {
    name: 'AppHeader',
    components: {
      AppHeaderAppointmentModal,
      BaseButton
    },
    props: {
      user: {
        type: Object,
        default: () => ({})
      }
    },
    data() {
      return {
        modalOpen: false,
      }
    },
    methods: {
      handleCloseModal() {
        this.modalOpen = false;
      },
      handleOpenAppointmentModal() {
        this.modalOpen = true;
      },
      handleEmitAppointment(data) {
        this.$emit('submit-appointment', data);
        this.handleCloseModal();
      }
    }
  }
</script>

<style scoped lang="scss">
  .app-header {
    display: flex;
    align-items: center;
    justify-content: space-between;
    padding-bottom: $ui-default-measure3x;

    img {
      border-radius: $ui-default-border-radius--circle;
    }

    &__user {
      height: 56px;
      display: flex;
      align-items: center;

      span {
        display: inline-block;
        margin-left: $ui-default-measure2x;
        @include font(16, 500);
        color: $color-copy--dark;
      }
    }
  }
</style>
// Vue 3
<template>
  <header class="app-header">
    <Teleport
      to="#appointment-modal"
      :disabled="state.preview"
    >
      <div
        v-if="state.modalOpen && !state.preview"
        class="modal"
      >
        <!--eslint-disable -->
        <AppHeaderAppointmentModal
          v-model:city="state.city"
          v-model:specialty="state.specialty"
          v-model:name="state.name"
          v-model:date="state.date"
          @close="handleCloseModal"
          @submit="handleEmitAppointment"
        />
        <!--eslint-enable -->
      </div>
    </Teleport>
    <BaseButton @click="handleOpenAppointmentModal">
      Make an appointment
    </BaseButton>
    <div>
      <BaseButton
        :small="true"
        @click="handleTogglePreview"
      >
        Toggle preview only mode to enable/disable Teleport in Make an appointment
      </BaseButton>
      Teleport modal: {{ state.preview ? 'disabled' : 'enabled' }}
    </div>
    <div class="app-header__user">
      <img :src="state.user.photo" alt="User image">
      <span>
        {{ state.user.name }}
      </span>
    </div>
  </header>
</template>

<script lang="ts">
  import { reactive, defineComponent } from 'vue';
  import axios from 'axios';

  import AppHeaderAppointmentModal from './AppHeaderAppointmentModal.vue';
  import BaseButton from './common/BaseButton.vue';

  interface User {
    name: string,
    photo: string
  }

  interface State {
    modalOpen: boolean,
    preview: boolean,
    user: User,
    city: string,
    specialty: string,
    name: string,
    date: string
  }

  interface AppHeaderReturnData {
    state: State,
    handleCloseModal: any,
    handleEmitAppointment: any,
    handleOpenAppointmentModal: any,
    handleTogglePreview: any
  }

  export default defineComponent({
    name: 'AppHeader',
    components: {
      AppHeaderAppointmentModal,
      BaseButton
    },
    async setup(props, { emit }) {
      const state = reactive<State>({
        modalOpen: false,
        preview: false,
        user: {
          name: '',
          photo: ''
        },
        city: '',
        specialty: '',
        name: '',
        date: ''
      });

      function handleCloseModal() {
        state.modalOpen = false;
      }

      function handleOpenAppointmentModal() {
        state.modalOpen = true;
      }

      function handleTogglePreview() {
        state.preview = !state.preview;
      }

      function handleEmitAppointment() {
        emit('submit-appointment', {
          specialty: state.specialty,
          name: state.name,
          date: state.date
        });

        handleCloseModal();
      }

      const { data } = await axios.get('https://randomuser.me/api/');

      state.user = {
        photo: data.results[0].picture.thumbnail,
        name: `${data.results[0].name.first} ${data.results[0].name.last}`
      }

      const returnData: AppHeaderReturnData = {
        state,
        handleCloseModal,
        handleEmitAppointment,
        handleOpenAppointmentModal,
        handleTogglePreview
      }

      return {...returnData};
    }
  })
</script>

<style scoped lang="scss">
  .app-header {
    display: flex;
    align-items: center;
    justify-content: space-between;
    padding-bottom: $ui-default-measure3x;

    &__user {
      height: 56px;
      display: flex;
      align-items: center;

      img {
        border-radius: $ui-default-border-radius--circle;
      }

      span {
        display: inline-block;
        margin-left: $ui-default-measure2x;
        @include font(16, 500);
        color: $color-copy--dark;
      }
    }
  }
</style>
Dashboard
In this file you will see the biggest difference thanks to the Composition API.
In Vue 3, in the setup function I use all modules that I created in helper files to keep the file clean.
In Vue 2, I’ve decided to declare all data and functions there to make a bit of a mess and to show you that when done properly, Vue 3 creates better separation for parts of business logic.
// Vue 2

<template>
  <div class="dashboard">
    <AppHeader
      :user="user"
      class="app__header"
      @submit-appointment="handleSubmitAppointment"
    ></AppHeader>
    <div
      v-if="newsModalOpen"
      class="modal"
    >
      <DashboardNewsModal
        :data="activeNews"
        @close="handleCloseNewsModal"
      />
    </div>
    <div class="dashboard__upper">
      <BaseBox title="Upcoming appointments">
        <DashboardAppointments
          :data="appointments"
          @confirm="handleChangeAppointmentStatus($event, 'confirmed')"
          @reject="handleChangeAppointmentStatus($event, 'rejected')"
        ></DashboardAppointments>
      </BaseBox>
      <BaseBox title="Recent results">
        <DashboardResults
          :data="currentResultsData"
          :month="month"
          :type="type"
          @change-month="handleChangeMonth"
          @change-type="handleChangeType"
        ></DashboardResults>
      </BaseBox>
    </div>
    <div class="dashboard__lower">
      <BaseBox title="News">
        <DashboardNews
          :data="news"
          @open="handleOpenNewsModal"
        />
      </BaseBox>
      <BaseBox title="Current prescriptions">
        <DashboardPrescriptions :data="prescriptions" />
      </BaseBox>
      <BaseBox title="Notifications">
        <DashboardNotifications
          :data="notifications"
          @dismiss="handleNotificationsDismissal"
        />
      </BaseBox>
    </div>
  </div>
</template>

<script>
  import BaseBox from '../components/common/BaseBox';
  import DashboardAppointments from '../components/dashboard/DashboardAppointments';
  import DashboardNews from '../components/dashboard/DashboardNews';
  import DashboardPrescriptions from '../components/dashboard/DashboardPrescriptions';
  import DashboardNotifications from '../components/dashboard/DashboardNotifications';
  import DashboardResults from '../components/dashboard/DashboardResults';
  import DashboardNewsModal from '../components/dashboard/DashboardNewsModal';
  import AppHeader from '@/components/AppHeader.vue';
  import {
    resultsDataMock,
    appointmentsMock,
    prescriptionsMock,
    notificationsMock,
    newsMock
  } from '@/mocks/mocks';

  export default {
    name: 'Dashboard',
    components: {
      BaseBox,
      DashboardAppointments,
      DashboardNews,
      DashboardPrescriptions,
      DashboardNotifications,
      DashboardResults,
      DashboardNewsModal,
      AppHeader
    },
    props: {
      user: {
        type: Object,
        default: () => ({})
      }
    },
    data() {
      return {
        newsModalOpen: false,
        activeNews: null,
        month: 'july',
        type: 'glucose',
        resultsData: resultsDataMock,
        appointments: appointmentsMock,
        news: newsMock,
        prescriptions: prescriptionsMock,
        notifications: notificationsMock
      }
    },
    computed: {
      currentResultsData() {
        return this.resultsData[this.type]['2020'][this.month];
      }
    },
    methods: {
      handleCloseNewsModal() {
        this.newsModalOpen = false;
        this.activeNews = null;
      },
      handleOpenNewsModal(news) {
        this.newsModalOpen = true;
        this.activeNews = news;
      },
      handleNotificationsDismissal(id) {
        this.notifications = this.notifications.filter(notif => notif.id !== id)
      },
      handleChangeAppointmentStatus(id, status) {
        const index = this.appointments.findIndex(app => app.id === id);

        this.appointments = [
          ...this.appointments.slice(0, index),
          {
            ...this.appointments[index],
            status
          },
          ...this.appointments.slice(index + 1)
        ]

        if (status === 'rejected') {
          this.addNotification('action', `You rejected the appointment with ${this.appointments[index].doctor.name}, ${this.appointments[index].doctor.specialty}`)

        } else {
          this.addNotification('info', `You confirmed the appointment with ${this.appointments[index].doctor.name}, ${this.appointments[index].doctor.specialty}`)
        }
      },
      handleSubmitAppointment({specialty, name, date}) {
        this.appointments = [
          {
            id: this.appointments.length + 1,
            date,
            status: null,
            doctor: {
              photo: 'https://randomuser.me/api/portraits/thumb/women/95.jpg',
              name,
              specialty
            }
          },
          ...this.appointments
        ]
        this.addNotification('action', `You made an appointment with ${name}, ${specialty}`)
      },
      handleChangeType(type) {
        this.type = type;
      },
      handleChangeMonth(month) {
        this.month = month;
      },
      addNotification(type, message) {
        this.notifications = [
          {
            id: this.notifications.length + 1,
            type,
            message,
            date: '01/08/2020'
          },
          ...this.notifications
        ]
      }
    }
  };
</script>

<style lang="scss">
  .dashboard {
    display: flex;
    flex-direction: column;
    padding: $ui-default-measure4x;

    @include xl-up {
      padding: $ui-default-measure4x 70px;
    }

    &__upper,
    &__lower {
      display: flex;
      flex-wrap: nowrap;

      > .base-box {
        &:not(:first-of-type) {
          margin-left: $ui-default-measure2x;
        }
      }
    }

    &__upper {
      height: 55%;
      padding-bottom: $ui-default-measure3x;

      > .base-box {
        &:first-of-type {
          flex: 1;
        }

        &:nth-of-type(2) {
          flex: 2;
        }
      }
    }

    &__lower {
      height: 45%;

      > .base-box {
        &:first-of-type {
          flex: 3;
        }

        &:nth-of-type(2) {
          flex: 3;
        }

        &:nth-of-type(3) {
          flex: 4;
        }
      }
    }
  }
</style>
// Vue 3

<template>
  <div class="dashboard">
    <Suspense>
      <div class="dashboard__content">
        <AppHeader
          class="dashboard__header"
          @submit-appointment="appointments.handleSubmitAppointment"
        ></AppHeader>
        <Teleport to="#news-modal">
          <div
            v-if="news.state.modalOpen"
            class="modal"
          >
            <DashboardNewsModal
              :data="news.state.activeNews"
              @close="news.handleCloseNewsModal"
            />
          </div>
        </Teleport>
        <div class="dashboard__upper">
          <BaseBox title="Upcoming appointments">
            <DashboardAppointments
              :data="appointments.list.value"
              @confirm="appointments.handleChangeAppointmentStatus($event, 'confirmed')"
              @reject="appointments.handleChangeAppointmentStatus($event, 'rejected')"
            ></DashboardAppointments>
          </BaseBox>
          <BaseBox title="Recent results">
            <DashboardResults
              :data="results.currentResultsData.value"
              :month="results.month.value"
              :type="results.type.value"
              @change-month="results.handleChangeMonth"
              @change-type="results.handleChangeType"
            ></DashboardResults>
          </BaseBox>
        </div>
        <div class="dashboard__lower">
          <BaseBox title="News">
            <DashboardNews
              :data="news.list.value"
              @open="news.handleOpenNewsModal"
            />
          </BaseBox>
          <BaseBox title="Current prescriptions">
            <DashboardPrescriptions :data="prescriptions.list.value" />
          </BaseBox>
          <BaseBox title="Notifications">
            <DashboardNotifications
              :data="notifications.list.value"
              @dismiss="notifications.handleNotificationsDismissal"
            />
          </BaseBox>
        </div>
      </div>
      <template #fallback>
        <div class="dashboard__loading">Loading...</div>
      </template>
    </Suspense>
  </div>
</template>

<script lang="ts">
  import { defineComponent } from 'vue';

  import BaseBox from '@/components/common/BaseBox';
  import DashboardAppointments from '@/components/dashboard/DashboardAppointments';
  import DashboardNews from '@/components/dashboard/DashboardNews';
  import DashboardPrescriptions from '@/components/dashboard/DashboardPrescriptions';
  import DashboardNotifications from '@/components/dashboard/DashboardNotifications';
  import DashboardResults from '@/components/dashboard/DashboardResults';
  import DashboardNewsModal from '@/components/dashboard/DashboardNewsModal';
  import AppHeader from '@/components/AppHeader.vue';

  import { useAppointments } from '@/views/dashboard-appointments.setup';
  import { useResults } from '@/views/dashboard-results.setup';
  import { useNews } from '@/views/dashboard-news.setup';
  import { usePrescriptions } from '@/views/dashboard-prescriptions.setup';
  import { useNotifications } from '@/views/dashboard-notifications.setup';
  import { DashboardReturnData } from '@/views/dashboard.interfaces';

  export default defineComponent({
    name: 'Dashboard',
    components: {
      BaseBox,
      DashboardAppointments,
      DashboardNews,
      DashboardPrescriptions,
      DashboardNotifications,
      DashboardResults,
      DashboardNewsModal,
      AppHeader
    },
    setup(): DashboardReturnData {
      const notifications = useNotifications();
      const appointments = useAppointments(notifications);
      const results = useResults();
      const news = useNews();
      const prescriptions = usePrescriptions();

      return {
        appointments,
        results,
        news,
        notifications,
        prescriptions
      }
    }
  });
</script>


<style lang="scss">
.dashboard {
  display: flex;
  flex-direction: column;
  padding: $ui-default-measure4x;

  @include xl-up {
    padding: $ui-default-measure4x 70px;
  }

  &__content {
    height: 100%;
  }

  &__header {
    height: 90px;
    width: 100%;
  }

  &__upper,
  &__lower {
    display: flex;
    flex-wrap: nowrap;

    > .base-box {
      &:not(:first-of-type) {
        margin-left: $ui-default-measure2x;
      }
    }
  }

  &__upper {
    // each has half of header substracted
    height: calc(55% - 45px);
    padding-bottom: $ui-default-measure3x;

    > .base-box {
      &:first-of-type {
        flex: 1;
      }

      &:nth-of-type(2) {
        flex: 2;
      }
    }
  }

  &__lower {
    // each has half of header substracted
    height: calc(45% - 45px);

    > .base-box {
      &:first-of-type {
        flex: 3;
      }

      &:nth-of-type(2) {
        flex: 3;
      }

      &:nth-of-type(3) {
        flex: 4;
      }
    }
  }

  &__loading {
    height: 100vh;
    width: 100%;
    background: $color-primary-background;
    display: flex;
    align-items: center;
    justify-content: center;
    @include font(20, 500);
  }
}
</style>
Modals with Teleport
// Vue 2
// part of index.html

<body>
  <div id="app"></div>
</body>

// part of AppHeader.vue

<template>
  <div
    v-if="modalOpen"
    class="modal"
  >
    <AppHeaderAppointmentModal
      @close="handleCloseModal"
      @submit="handleEmitAppointment"
    />
  </div>
</template>// Vue 3
// part of index.html
<body>
<div id="app"></div>
<div id="appointment-modal"></div>
<div id="news-modal"></div>
</body>
// part of AppHeader.vue
<template>
<Teleport
to="#appointment-modal"
:disabled="state.preview"
>
<div
v-if="state.modalOpen && !state.preview"
class="modal"
>
<!--eslint-disable -->
<AppHeaderAppointmentModal
v-model:city="state.city"
v-model:specialty="state.specialty"
v-model:name="state.name"
v-model:date="state.date"
@close="handleCloseModal"
@submit="handleEmitAppointment"
/>
<!--eslint-enable -->
</div>
</Teleport>
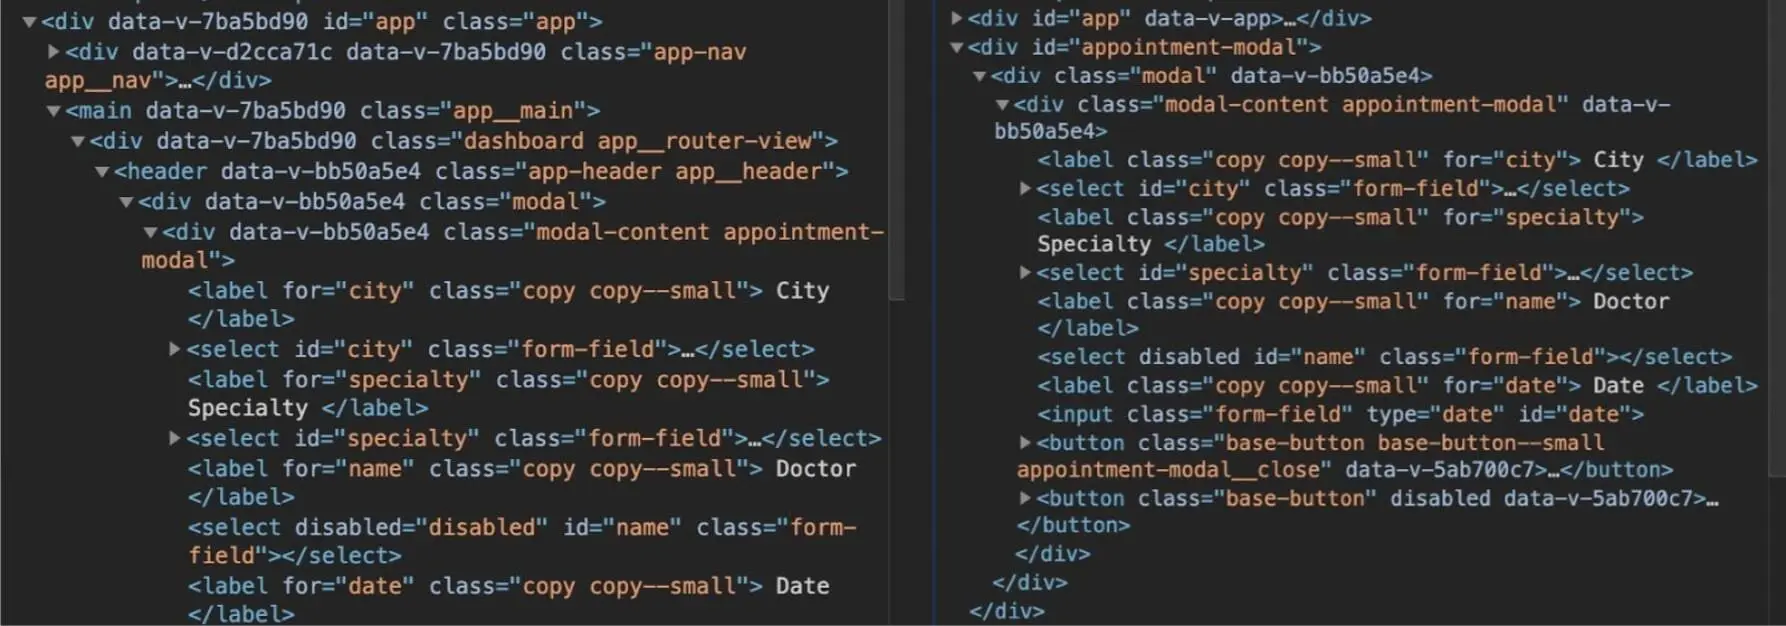
</template>Difference in DOM structure when Teleport is used.
On the screenshot below you can see that when Teleport is used, our modal is a sibling of the #app div. This is advantageous in many ways, for example for styling purposes.

Other components - AppNav, DashboardAppointments, DashboardNews, DashboardResults, DashboardChart, DashboardNotifications and DashboardPrescriptions were created as presentational components and are not as valuable to show here. You can find all of them either in this or this folder.
TypeScript in Vue 3
In dashboard.interfaces.ts file, you can find most of the interfaces used throughout the Vue 3 project. Take a look at two examples on how it’s declared and used.
// part of dashboard.interfaces.ts

export interface Notification {
  id: number,
  type: string,
  message: string,
  date: string
}

export interface NotificationsReturnData {
  list: Ref<Notification[]>,
  handleNotificationsDismissal: any,
  addNotification: any
}

// dashboard-notifications.setup.ts

import { ref } from 'vue';

import { notificationsMock } from '@/mocks/mocks';
import { Notification, NotificationsReturnData } from "@/views/dashboard.interfaces";

export function useNotifications(): NotificationsReturnData {
  const list = ref<Notification[]>(notificationsMock);

  function handleNotificationsDismissal(id: number) {
    list.value = list.value.filter(notif => notif.id !== id)
  }

  function addNotification(type: string, message: string) {
    const newNotification: Notification = {
      id: Number(list.value.length + 1),
      type,
      message,
      date: '01/08/2020'
    };

    list.value = [
      {...newNotification},
      ...list.value
    ]
  }

  return {
    list,
    handleNotificationsDismissal,
    addNotification
  }
}
Router
There are some changes in the main router file as well. You can see them below. The main difference in my app is how history mode is used and how the fallback route is defined but there are more changes that you can see in the Migration Guide.
// Vue 2

import Vue from 'vue';
import VueRouter from 'vue-router';

Vue.use(VueRouter);

const routes = [
  {
    path: '/dashboard',
    name: 'Dashboard',
    component: () =>
        import(/* webpackChunkName: 'dashboard' */ '../views/Dashboard.vue')
  },
  {
    path: '*',
    redirect: () => '/dashboard'
  }
];

const router = new VueRouter({
  mode: 'history',
  base: process.env.BASE_URL,
  routes
});

export default router;
// Vue 3

import { createRouter, createWebHistory } from "vue-router";

const routes = [
  {
    path: '/dashboard',
    name: 'Dashboard',
    component: () =>
        import(/* webpackChunkName: 'dashboard' */ '../views/Dashboard.vue')
  },
  {
    path: '/:pathMatch(.*)*',
    redirect: () => '/dashboard'
  }
];

const router = createRouter({
  history: createWebHistory(process.env.BASE_URL),
  routes
});

export default router;
Other
Multi v-model on custom component
In AppHeader, I used a new feature of multi v-model on a custom component. In this case it might’ve not been the best way to use this v-model, but I wanted to show you how to do it.
Thanks to that, I kept AppHeaderAppointmentModal more presentational.
// Vue 2
// part of AppHeaderAppointmentModal.vue
<template>
  <select
    v-model="city"
    id="city"
    class="form-field"
    >
    <option
      v-for="option in cities"
      :key="option.value"
      :value="option.value"
    >
      {{ option.label }}
    </option>
  </select>
</template>

// ...

<script>
  export default {
    data() {
      return {
        city: null,
        specialty: null,
        name: null,
        date: null
      }
    }
  }
</script>// Vue 3
// part of AppHeader.vue
<template>
<AppHeaderAppointmentModal
v-model:city="state.city"
v-model:specialty="state.specialty"
v-model:name="state.name"
v-model:date="state.date"
@close="handleCloseModal"
@submit="handleEmitAppointment"
/>
</template>
<script>
import { reactive, defineComponent } from 'vue';
export default defineComponent({
setup() {
const state = reactive<State>({
// ...
city: '',
specialty: '',
name: '',
date: ''
});
// ...
return {
state,
// ...
}
}
}
</script>
// part of AppHeaderAppointmentModal - updating the values
<template>
<select
:value="city"
id="city"
class="form-field"
@change="updateValue($event.target.value, 'city')"
>
<option
v-for="option in state.cities"
:key="option.value"
:value="option.value"
>
{{ option.label }}
</option>
</select>
</template>
<script>
export default {
setup() {
function updateValue(value, key) {
emit(`update:${key}`, value)
}
// ...
return {
updateValue
}
}
}
</script>Summary
So this is how you make the same app with Vue 2 and Vue 3. For more information you can always check the repo, as I didn’t want to paste all of the code into this article.
We’re all very excited for Vue 3. I hope you found this tutorial helpful and now you feel that you understand the new concepts better.
Check the repos and live demos:
- https://github.com/BartoszBilejczyk/health-dashboard-vue3-ts
- https://github.com/BartoszBilejczyk/health-dashboard-vue3
- https://github.com/BartoszBilejczyk/health-dashboard-vue2
- https://health-dashboard-vue3-ts.netlify.app/dashboard
- https://health-dashboard-vue3.netlify.app/dashboard
- https://health-dashboard-vue2.netlify.app/dashboard
The current migration guide is available here and the docs for Vue 3 are here. Remember that there are also many articles and new courses coming up every week, so look out for those.
It’s your turn to create something in Vue 3. Give it a shot.


